The big news for this week is the release of Corel’s updated version of VideoStudio from Pro X8 to Pro X9.
This time around they have continued to offer the program at two levels depending on how much bang for your buck you want or need.
You can check the comparison chart for the two version here: VideoStudio Pro X9 Comparison chart.
I will of course be updating the full review of the program some time this week (I hope… maybe!) but in the meantime here is a rundown on some of the new stuff.
Multicam Editing
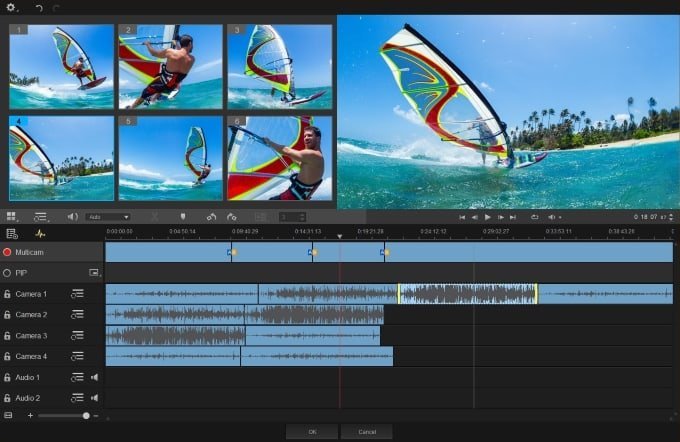
First up and probably the biggest addition to this new version is the ability to perform multicam editing.
This is a feature that has been offered by a number of Corel’s competitors for some time but up until now I think it has been one of those “nice to have” features but not really applicable to their wider customer base.
However in the present things have changed and it is pretty common these days to be able to access footage of an event from a number of devices so the ability to incorporate it all into a project is a great feature to have.
The problem with multicam editing has always been working out a way to sync the various pieces of footage so that you can simply switch from one clip to another in an easy way.
In this new module you can let the VideoStudio try to achieve sync based on the audio and if you have managed to get footage with a common audio event, it does a pretty good job.
If you don’t have a common audio event to sync with before you start switching in the editing suite you will have to get everything lined up manually but once that is done it makes editing a breeze.
In the VideoStudio Pro X9 version you can have up to four clips for switching and in the Ultimate version you can deal with 6.
New Filters
This years versions also come with NewBlue FX Video Essentials version 7 which add a few more handy filters to an already impressive list of features.
There are a couple of filters in there that provide some powerful analysis of your footage for further processing but I personally think the new Auto Pan and Flying PiP filters will prove to be the more useful to the average person.
Both of these filters do pretty much what they say on the box but with a little difference.
Pan and Zoom filters as well as PiP filters generally present you with a blank space to begin with.
By that I mean you pretty much have to start from scratch to build up the effect you are going for and this can be a little time consuming and tedious.
These new ones offer excellent manual control and also a series of very useful presets that you can adjust to your liking.
This adjustment of a preset as opposed to a start from scratch method is a real time saver and pain reliever.
In addition to all of that there is one other new filter in the package called Video Tuneup Plus which is a correction tool that uses the contrast within a video to adjust and correct color.
Motion Tracking
Another excellent improvement is in the Motion Tracking module which although was pretty good anyway has been improved enormously by the addition of another system for tracking.
Previously you had the ability to select a point that you wanted tracked or an area.
That area was actually restricted to a square and between the two systems you could generally track with pretty good accuracy.
The problem with auto tracking is always that because you are dealing with video, stuff moves around and changes as the footage progresses.
If you selected a box shape to track in a clip everything would be fine until the camera angle changed enough for the box to not appear square anymore.
At that point the software would “lose sight” of it and you would have to reset the tracking and continue from that point.
To increase the module’s ability to deal with this they have added another type of tracking called Multipoint tracking.
Using this you can select four points around an object not necessarily square or rectangular in shape and have the software track it far more effectively.
Audio
They have made a couple of improvements to the audio capabilities of the program that don’t actually add any greater capability but do add more convenience.
The first is to the Normalization feature which automatically levels all the audio tracks to a common volume level.
Usually video shot from different sources or at different times have widely differing volume levels and these need to be evened out before rendering.
The old version only allowed this to be done prior to the final rendering of the project.
The new version allows to you do it while you are still in the Editing module.
The second of the improvements is the Audio Ducking feature they added in the last version.
“Ducking” is the action of lowering the background music or sound when any voiceover or narration starts then raising that sound back up when the narration finishes.
The ducking feature in VideoStudio can do this quite well automatically by analyzing the audio tracks and making the necessary adjustments.
It is certainly not a perfect system but way better then trying to do it manually!
The new version has added a couple of more controls over the process allowing you to adjust how quickly the audio is raised or lowered and a sensitivity setting to fine tune the auto functions to your projects.
All in all a pretty solid update by Corel and thankfully they don’t seem to have included any half baked wizzbang features purely to drive sales.
As I mentioned before I will be updating the full review over the next week or so but in the meantime you can check the software out for yourself at the Corel site.
Some Slow Motion Tips
One common disappointment get from quite a few readers of this site concerns the quality of their videos when they apply slow motion effects.
In fact any change of speed tends to create result that they just were not anticipating.
There are some pretty simple technical reasons for this and the main reason most people are unaware of them is because once again the marketing departments are quick to crow about a feature without explaining it.
This is a problem that had become even more pronounced over time due to the way that modern video files are compressed so as to save on space.
Everyone wants cinema quality but they want it in tiny files and somewhere along the line it all ends in tears!
The bottom line is that when you record in any of the current video file formats, that format and the parameters that you are recording under have been specifically designed to get the best quality possible at the smallest file size possible.
The key to all of this and a point often unseen is that the quality has been tailored to the file being played back at the exact same rate (frames per second) that it was recorded at.
The second you try to change that to something faster or slower, your recording parameters are rendered inappropriate.
Let’s say you record at 25 frames per second.
You play back that file at normal speed at it looks fine.
If you then try to play it in slow motion you will notice degradation in both the image quality and the smoothness in which motion is shown.
People tend to think of video in terms of film unfortunately and if it was film, slowing it down would mean it looks the same only slower.
Video does not work that way.
If we go back to the 25fps example one second of video will consist of 25 frames of video.
If we slow that video down so that it now takes 3 seconds to play (slow motion) you have to ask yourself how can it do that given it only has 1 seconds worth of frames.
The answer to that is that it simply repeats the first frame three times, then repeats the second frame and the third and so on.
The result being a loss of image quality and the degradation of the motion because it is just repeating the same thing three times then jumping to the next frame.
This is the entire reason why action cams such as the GoPro have those crazy high frame rate recording modes.
At normal speed there is an abundance or excess of frames recorded, in slow motion the picture quality and the smoothness of the motion can be preserved.
Of course in a pinch you can apply slow motion to a clip, but if you know you may be including a slow motion sequence then there are some simple things you can do to ensure you preserve the best quality you can. check the link below.
Is Micro Four Thirds Dead?
I have always been a bit wary of statements to the effect that some technique or technology or whatever “is dead.”
Usually the people making these kinds of statements are quick to follow it up with some kind of sales pitch for whatever it is they want to sell you rather than the newly “dead” thing!
However in this case I think we can safely make an exception.
Micro Four Thirds was a system developed a while back for using a smaller sized sensor in cameras but at the same time offering huge savings not only in price but in size.
At the time it looked very much to be the next big thing and again, at that time, the kind of performance they were offering in the video world was pretty exceptional.
These day all that has changed with some of the big manufacturers like Sony offering full frame sensors in camera bodies that make the Micro four thirds bodies look positively clunky.
Anyway, don’t just take it from me, take from a person that actually knows about this stuff.
Leave a Reply