Introducing Pinnacle Studio 21 Ultimate
This week Corel announced the latest release of Pinnacle Studio 21 so it was with the usual “new release” mixed feelings that I got hold of an evaluation copy to take a look.
Now bear in mind that the release of a new version of any video editing software in my world adds up to one thing.
I am going to have to go through the pain of testing that software and (groan) rewrite my existing review.
I am an inherently lazy man so in reality the playing around with new software part is quite fun, on the other hand the writing of the review part… not so much.
This situation is usually made worse by the fact that new releases are generally comprised of:
1. Packaging the hotfixes and patches released over the previous year into the core program.
2. The addition of a couple of new features that may or may not be useful/noteworthy so that the marketing department has something to gush over in the press!
A Little Background
Corel purchased Pinnacle Studio a few years back and have since then been engaged in an ongoing process of taming this formerly buggy yet incredibly powerful video editor.
Every release has taken them that one step closer to getting it running smoothly on a wide range of computers and adding in all the newer features that one would expect to see in a modern editing solution.
In my opinion they had pretty well achieved this by version 19 and version 20 was a matter of tying up a few loose ends.
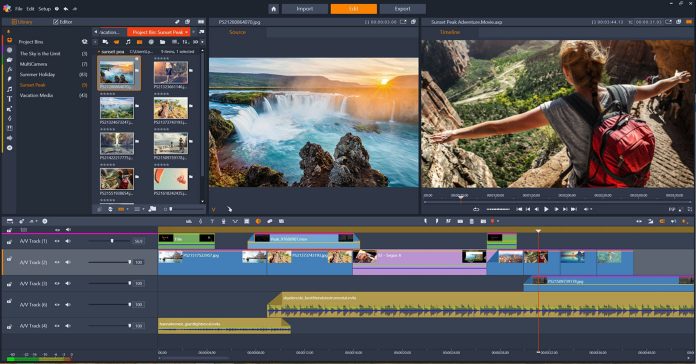
With version 21 of Pinnacle Studio Corel have totally knocked it out of the ball park and they have done it with one simple redesign of the interface.
The problem for Pinnacle was never that it lacked features, power or control.
What it lacked was the ability to allow the user easy and intuitive access to all that power and control.
To say that there was a learning curve associated with getting to grips with Pinnacle would have been a bit of an understatement!
I remember very well the first time I ever opened up Pinnacle to take it for a test drive.
The reason it was so memorable was because of the sound of my jaw dropping and hitting the desk.
I am quite experienced with many brands of video editing software and I can safely say I had never seen anything quite so complicated, cluttered and utterly forbidding.
There was nothing on that interface that gave me any clue as to how to get started with it.
Yesterday I opened up the new version of Pinnacle and was merrily adding clips and running through the features without referring in any way to the Help files or “How to” videos.
Suddenly it dawned on me that the new Pinnacle Studio 21 is… wait for it… intuitive!
Now there’s a sentence I never thought I would write!
Any this week I will be working on the new review of Pinnacle Studio 21 and should have it posted sometime next week.
In the meantime here’s a gushy marketing video from Pinnacle just to make sure we observe the correct “new release” protocols.
By the way, keep an eye out for the “Morphing Transitions” feature they have added, it is an absolute cracker.
You can check out the new version of Pinnacle Studio 21 HERE.
Action Movie Effects Tutorial
OK the full title of the video below was written as follows:
Action Movie Effects Tutorial | Instantly Make Hollywood Films.
In all honesty it is probably going to take a little more than a handheld iPhone and a copy of a consumer level video editor on a home computer to realistically “Make Hollywood Films!”
So given that we can all set our sights a tad lower than that the video does provide you with some tools and techniques that will get you something better than a bunch of guys yelling, “pew, pew, pew” when they fire their plastic guns!
Tutorial Video Projects
Video tutorials are a form of video project that can be quite a powerful way to teach and inform an audience.
At the moment and just from memory, I know that Corel VideoStudio, CyberLink PowerDirector, Pinnacle Studio, Filmora and Magix Movie Edit Pro all come bundled with a built-in screen recorder.
There may be others I am not aware of.
Anyway the point of this is that the ability to make a screen recording of any process on your computer is within the reach of most people.
As per usual in the world of video projects, just because you have the equipment to do it and the willingness to do it that doesn’t necessarily equate to doing it particularly well!
Check out the article below and the video embedded in it for some great tips on creating this style of video presentation.
Adding Time Codes
Back in the dark days of mini-dv video recorded on to tape in standard definition you had two choices when it came to time codes.
The first was to have the camera actually burn the time-code into the video footage so that there was no way you could get it off the screen.
Once you had it, you had it forever!
The other choice was to turn the time code choice off and have none at all.
This caused problems for when you actually wanted to add a time code because the information wasn’t there!
That all led to a series of rather clunky effects filters that allowed you to sort of “cobble together” a time code on the screen but it was terribly fiddly to get done.
These days things are a little easier and most video editor software will have buried somewhere in the dark recesses of its effects filters a time code filter.
Using them is pretty easy, finding them can be much harder!
Here are a couple of video showing how to get to them in PowerDirector and Pinnacle Studio.
Timecode – Countdown Tutorial – CyberLink PowerDirector
Pinnacle Studio Time Clock – Countdown
Slow Motion and Speed Ramping Tutorial
One of the most powerful things about video editing is the way in which you can manipulate audience perception by manipulating time within the video itself.
In its most simple form you can create the perception of time moving more quickly by introducing sequences of short fast cuts from shot to shot.
Conversely you can slow time down to “real time” or even slower by using longer shots between cuts and then slow it down even more by adding slow transitions in between those cuts to give the impression of time going really slowly.
Up until recently you also had the ability to speed up or slow down the footage itself by using various fast or slow motion settings.
These days the amount of control you can exercise has increased to even greater heights with the introduction of key-frames.
Key-frames are one of the kind of un-sexy technical features that have been around for a while and don’t really get much attention because they enable other effects rather than operate as an effect unto themselves.
Simply put a key-frame is like a little marker you can add to a frame in a clip and at that marker instruct some effect or some feature to begin working at that point.
You can then have that effect or feature continue to do whatever it is doing until you add a later key-frame at which point the effect is ended or altered.
Motion masks use key-frames to determine how and where an object will move over time plus a host of other effects use them in a similar manner.
One use of key-frames that hasn’t really had much exposure is that these days you can use them to very finely tune how you implement fast or slow motion sequences.
Before you had a clip and it either went at normal speed, fast speed or slow speed and that was pretty much it.
Now most editors allow you to set key-frames so that within a single clip or sequence of clips you can have moments of normal speed, moments of fast speed as well as moments of slow speed.
This technique is called Speed Ramping and can be used to create incredibly dramatic effects… or if used badly… incredibly cheesy effects!
Check the video below for some tips on how to use it.
As usual take note that even though this tutorial is using Filmora, most other editors will behave the same way.
Leave a Reply