First up, Why Filmora 15?
Before I get into the whole Wondershare Filmora 15 review it is important to address why Filmora has a place in the world of modern video editing.
Since the introduction of consumer level video editing software many years ago, the better known brands have been becoming more and more feature rich.
This is a bit of a “good news – bad news” scenario.
The upside of this “features arms race” has been software companies adding features to their products at a furious pace.
The downside is that every time they add something new they must add access to that feature and its settings.
This complicates the user interface resulting in software that looks more like the control console of a space shuttle!
Another downside and one that nobody really wants to discuss is that in many cases these advanced features are not necessarily things that everyone would actually use.
Often people just want something simple, easy to use with features that they would actually have a use for, so here we are with Filmora 156.
What Does Wondershare Filmora 15 Do?
The key to the success of Wondershare Filmora 15 is that balance between keeping it simple whilst at the same time providing tools and features that the average to advanced user would actually need.
They have kept the user interface clean, modern and uncluttered yet at the same time offering easy access to the features and functionality of the program.
Wondershare Filmora 15 comes in versions for both Windows and Mac and is my top choice for an easy or simple video editing software.
To get an idea of how it looks and behaves you can take a look at the video below before you continue with the rest of this Wondershare Filmora 15 review.
IMPORTANT NOTE! Keep in mind that this promotional video was created exclusively using Filmora 15 BUT… it was done by someone who REALLY knows how to use it!
Bear in mind that the video covers what’s new in this current version and doesn’t really show the existing features in any great detail.
You can see three videos covering pretty much all of the features that Filmora already packs by Clicking This Link Here to a recent blog post I did on it.
Filmora 15 Review
Getting Started
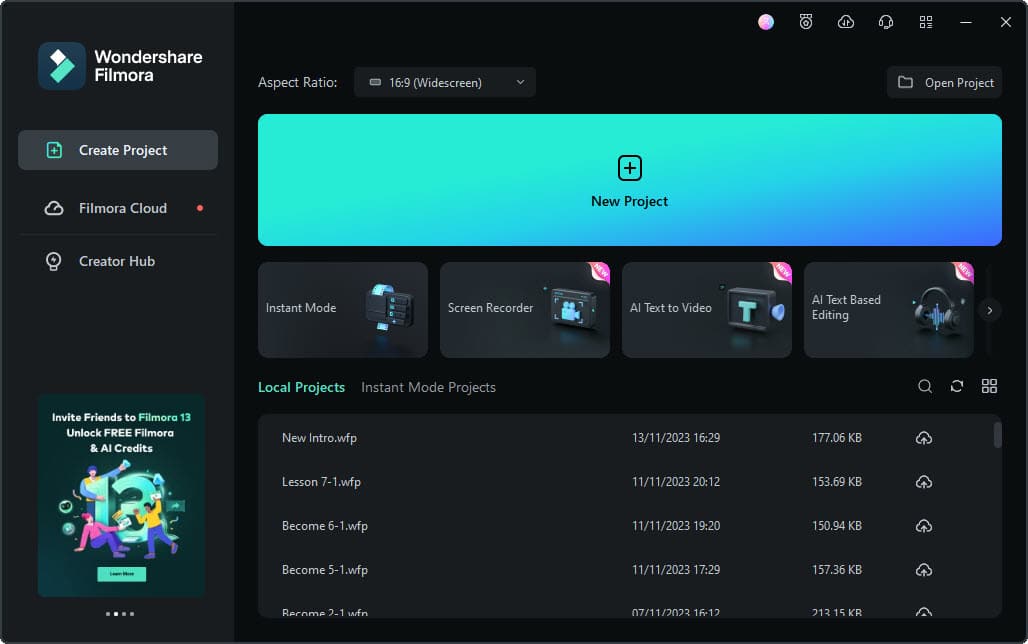
When you open the program you are presented with the simple splash screen shown below.
You can choose to keep this behavior or automatically bypass it next time and go directly to the editing interface.
This pretty much sets the tone for editing with Filmora with only the relevant information being needed to get going.
You can:
Choose the intended aspect ratio of your project which probably will be 16:9 as the most common.
However 1:1 for Instagram, 9:16 or 1:1 for Facebook, 4:3 for standard definition and 21:9 for cinema widescreen are also available.
Bear in mind that once you are inside the program proper you can also change the aspect ratio, resolution and other parameters of your project.
You can either select to create a new project or open one you have already been working on from the list of recent projects.
You can also access the built-in screen recorder, Auto Reframe feature and other new A.I. modules.
The full editing interface is shown below.
The User Interface
As you can see in the image below the Filmora interface is very simple with no hidden menus or endless menu trees of features.
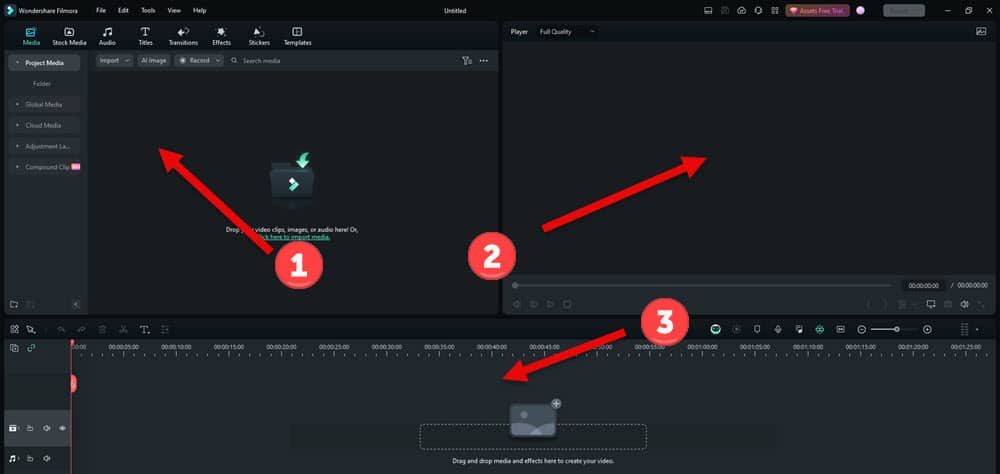
The three basic sections of the interface shown above are as follows although bear in mind that you can choose other layouts from the top right of the screen..
All of them can be adjusted in size to suit what you are doing at any time.
1. The library and Effects area where you can organize all of your video, audio and image assets as well as gain access to effects, filters and transitions.
Here you can also import media via the Instant Cutter which is a tool for loading footage and as it suggests whilst offering the ability to instantly isolate segments of that footage and render immediately to new files.
This is a very efficient way to pre-process your footage before it reaches the library and can save a bunch of time with footage you know needs to be trimmed or cut before you are going to use it.
2. The preview window where you can play back individual clips, a section of a project or a complete project prior to exporting.
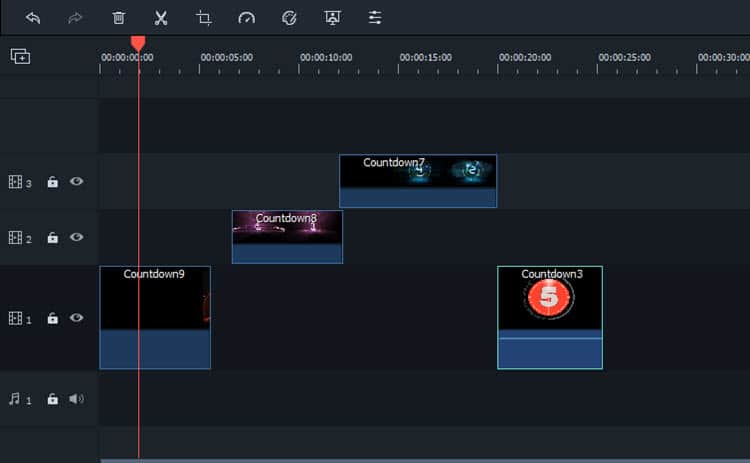
3. The timeline where you can add, arrange and individually edit all your video clips, audio and image files.
Editing is a simple drag and drop process to add things to the timeline with the timeline itself running on a “magnetic” system which causes assets to automatically stay together.
This is where you can add transitions, filters, special effects and engage in other editing actions and is really where you would be doing the bulk of your work.
There are 100 tracks available to be used for video, audio or images and it is here that you can access some of the more advanced tools on offer.
You really only have to look at the buttons to understand what it is for and that intuitive nature carries on throughout the entire program.
Simply cut in the middle of a file by placing the play head at that point and (obviously!) clicking the little scissors icon.
Lengthen or shorten a file by placing your cursor at the end and clicking and dragging.
Click and drag items on to the timeline, select and hit delete to get rid of them.
Editing Tools
There are quite a few advanced editing tools available in Filmora 15 shown in the image below offering excellent control over the look of your final video.
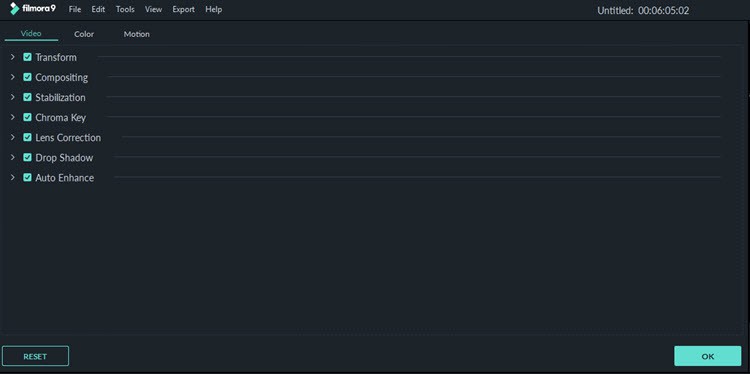
As you can see there are seven types or styles of tools offered which have within them quite good levels of customization allowing you to fine tune your video and image assets.
The Transform tool allows control over rotation and sizing, Compositing lets you apply blend modes to overlays and transitions and the Stabilization module does exactly what it says on the box!
Lens Correction can be applied to a wide range of action Cams already built into the program as presets because the properties of those lenses are already known.
However you can bypass those presets and manually adjust to your own needs.
Drop Shadow adds a shadow to images or videos or can be used when creating titles to give a more professional look.
And finally there is the Auto Enhance that can be gradiently applied to any less than perfect footage.
I have to add here that the Auto Enhance is a bit of a “hit or miss” option.
Either it works OK or it doesn’t and that depends on just how bad the footage is that you put into it.
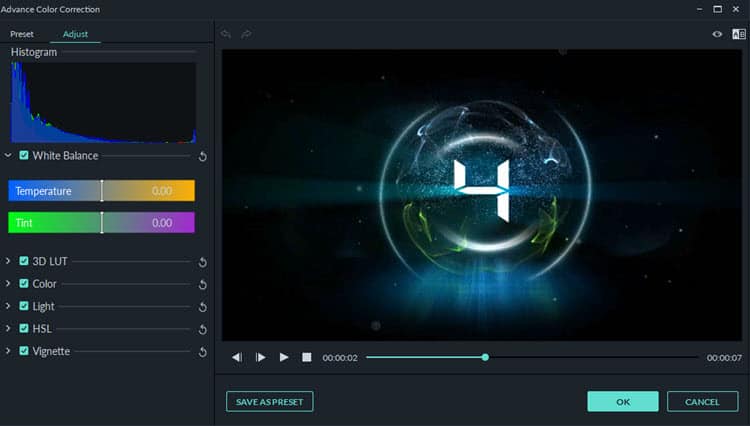
Color Correction
On top of all of that you also have a dedicated Color Correction module which allows you to both color correct your videos as well as color grade through the use of LUTs.
Transitions and Effects
Hiding in the background until you need them are over 300 special effects, objects, overlays, sound effects, music tracks and transitions you can use.
The software comes with 51 audio samples comprising of 25 sound effects and 26 music tracks that you can use in your projects.
On top of that there are 137 adjustable Titles presets, 178 Transitions most of which can be customized, 158 filters, 87 Overlays and 191 mask elements
There is a dedicated Pan and Zoom feature for adding and customizing animations for still images as well as being able to customize and animate text.
It has motion elements so you can drag and drop moving graphics on to your video and a separate motion tracking module as well.
Video Creation/Exporting
By hitting the Export Button a new module opens offering a vast array of formats in which you can export your project.
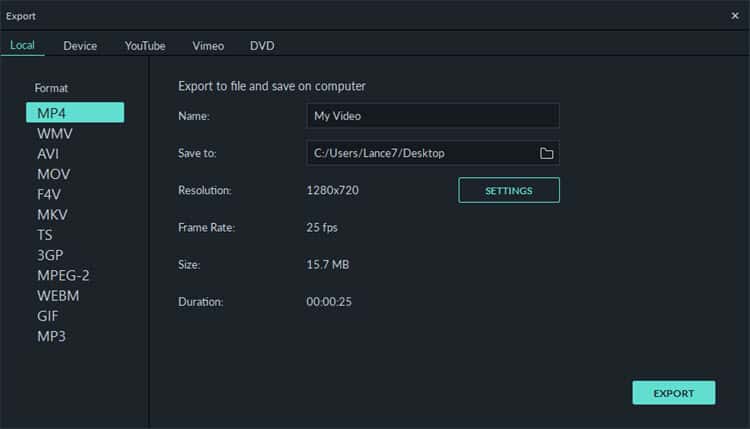
As you can see in the image above there are five basic choices to get you started towards exporting your final video into the most suitable format.
- Local for the creation of the most common video file formats.
- Device offering presets for the most common video viewing devices such as iPhone, iPad, Smart Phone etc.
- YouTube and Vimeo both of which are tailored to the latest best practices for uploading to those services.
- DVD for the creation of standard MPEG2 files for burning to DVD discs as well as the ability to burn the discs as well.
Each of the above are set at a default set of parameters and file types recognized as best for each but at any time you have full control over each one to adjust as you please.
A.I. Features in Filmora 15
In keeping with the current trends of the day no Filmora review would be complete if I didn’t address what they and everyone else is touting as the big features in their latest version, Filmora 15.
Of course, those features are the A.I. tools and whilst they certainly have a wow factor their marketing departments will be excited about, the real question is whether they of any real use!
A.I. Text Based Editor
In a nutshell this module in Filmora allows you to add video footage that has dialogue in it and have the program connect to a transcription service which quite quickly transcribes the spoken words into text.
You are then presented with a working screen that has the video on one side and the transcript on the other.
At that point you can edit the transcript just like any word processing document and as you do, changes and cuts are made to the video you are working with.
The transcription and cutting part is the A.I. aspect of it but at the same time you can add and edit the text as a subtitle file or export it separately as both a text and subtitle file for later use.
In addition that same module also offers translations into a number of common languages.
Is Text Based Editing Useful?
That depends entirely on the type of content you will be creating using the software.
If you are creating videos that are dialogue rich and for example want to upload to YouTube with really tight, fast editing then this is a godsend!
I use this for my wife’s videos that are spoken word all the way through and by using the text editor in conjunction with the Silence Detection tool I have cut my editing time in half easily.
If not then this may be a tool you use occasionally and as such not a priority for a purchasing decision.
Smart Background Music – A.I. Vocal Remover
One of the most time-consuming things you will have to deal with when it comes to video editing is searching for assets to use in your projects.
I don’t know how many hours of my life have been lost to endlessly scrolling through stock footage, stock image and stock audio sites trying to find an asset that is “just right!”
Music is one of the hardest because you have to stop and listen as you go and very often it is for background music anyway.
The A.I. Music Generation module in Filmora lets you select a mood and a duration for the music then uses A.I. to create the music.
This was introduced in version 14 of Filmora but has now been expanded to include the ability to analyse your project and suggest music based on that analysis.
Here’s the important part.
Because it is A.I. it is royalty free and will not attract copyright problems which is especially important if you are using services like YouTube.
Overall, an excellent feature.
The A.I. Vocal Remover pretty much does what it says on the box.
You can add any music with vocals to the timeline, right click and choose to Remove Vocals… and that’s what it does!
It is very accurate due to it being A.I. driven but as with anything like this you have to figure out if it is a feature you would actually use.
Here’s a video of both in action:
A.I. Text to Video
This works like most A.I. models such as Chat GPT where you enter an instruction (a Prompt) and the A.I. goes out and creates a video based on that prompt.
It depends on you having a script although you can also use the functions inside the module to have A.I. create the script for you.
Once you have the script the module creates a sort of montage video using available footage from within its library to create the video.
From what I can tell it is analyzing the script, identifying keywords or concepts then matching footage to those concepts.
It also creates a voiceover of the script using computer generated voices.
At this point in time, it’s kinda clunky and the results are nothing really to write home about.
Computer generated voices are definitely getting better but still sound slightly unnatural and the addition of generic stock footage doesn’t really result in anything great.
For me this is not something that would sway me towards purchasing the software but is definitely a feature worth watching into the future.
A.I. Smart Masking and Planar Tracking
Planar Tracking
Filmora has had an A.I.driven masking tool for a while now but in this version they have taken it to a new level.
Using advanced 3D tracking technology you can now attach image, graphic, text, or video elements not just to single tracked points but to entire flat surfaces in your footage.
This one is an absolute beast and one of the reasons I personally use Filmora for a lot of my projects.
The A.I. Smart Masking and Planar Tracking modules pretty much put an end to hours of work trying to either attach objects to moving targets or fine tune corrections to similarly moving targets..
You simply click a button and the A.I. Motion Tracking or Planar tracking kicks in and tracks that object as it is moving within the following frames all the while adjusting the mask and its position to keep the thing isolated… and that’s it!
Is it perfect? Well actually no!
If there is a lot of motion in the frame or if the thing being isolated is not clearly distinct from the background then it can be a little inaccurate at times.
However, fixing those little glitches is usually a few minutes of tidying up work as opposed to days of manually masking and tracking!
Here’s a look at it in use:
There are a number of other features added to this new Filmora 15 version some of which are more interesting than others.
Summary
Filmora 15 is a major upgrade to earlier versions of the Filmora Video Editor and to be honest I was a little worried the continued focus on A.I. may have caused Wondershare to lose their way.
The beauty of Filmora was always that despite a good range of features they remained focused on keeping the software simple in appearance and easy to learn and use.
Filmora 15, in keeping with customer demands, has incorporated a lot of new features and of course had to add access to those features into to the user interface.
I was very happy to see that in doing so they have not compromised on their original philosophy of keeping the software interface clean and intuitive.
It doesn’t really seem to matter what it is you want to do with the program, all you need do is look at the interface and pretty soon it seems obvious what it is.
The real problem in writing this review is trying to communicate the simplicity of the program without making it sound as though it is somehow crippled or lacking in features which is simply not true.
Click Here to See the Full Features at Wondershare Filmora
Key Takeaways
- Wondershare Filmora 15 strikes a balance between simplicity and advanced features, appealing to both average and expert users.
- The user interface remains clean and intuitive, focusing on efficiency while providing access to essential tools.
- Filmora 15 includes advanced editing tools, transitions, and A.I. features like a text-based editor and smart masking for easier video production.
- The software offers a variety of exporting options tailored to popular formats and devices, ensuring flexibility for users.
- Overall, Filmora 15 enhances video editing without compromising its user-friendly design, making it suitable for various content creators.
Good to know. I’m using X on the new M1 chip from Apple. Do you happen to know if there has been any improvements on the native use of Filmora 11 on the new processor? Thanks again.
Hi Jacq,
I don’t know of any update feature that was aimed specifically at M1 performance but of all the software I follow at this level of the market Filmora is easily the one being most actively developed.
I do know that overall, performance in rendering was addressed in this version but I don’t know the exact details.
I wonder if it’s really worth it upgrading from Filmora X. The added features you describe in 11 are also in X. I’m using the program for editing old Home movies, not for internet, Thank you.
Hi Jacq,
If you already own Filmora X then the upgrade to Filmora 11 is free.
Do you plan on doing a review of Filmora Pro, given how much you like Filmora X?
Hi Tim,
Filmora Pro is still quite a new piece of software and is still being developed at a pretty rapid rate at the moment.
I generally only review software that is well matured and pretty settled.
I am quite impressed with it so far but at around the U.S.$150 mark for me it has to make a strong case above or at least equal to the others at that price range.
I don’t believe it is quite there yet.
Lance, very good review, thanks! I appreciate how you explained the program features of Filmora 9 as well as your effort to answer all the questions posted here. It gives me confidence in your review and I will probably go ahead and subscribe to a plan.
Thanks, glad it helped!
I would agree, except the software automatically installs to the “C” drive and I can’t yet find a way to make it install on a different drive. I have only a 1 TB SSD and I only have the OS, Win 10 pro, on the “C” drive.
Please tell me you have a way to change the installation directory.
Hi Gordon,
When you first install Filmora the first thing that happens is that Windows asks if you want to do that right?
The very next splash screen that comes up is from the program itself and has a big “Install” button.
DO NOT hit that button!!!!
If you look at that splash screen, in the lower right hand corner you will see “Customize Install.”
Click that and you then get the option to install the software wherever you like on your computer.