
If you’re making YouTube videos, home movies or are basically operating at a “below Hollywood” level of video creation then the truth is you probably don’t need a complete guide to codecs!
However if you are like most people and are checking out various resources on the internet to improve your skills, it is more than likely you keep hearing things like “H.264,” “10 bit 4:2:2,” or “long GOP,” “shooting in RAW” and on and on.
That leads many of us to believe that somehow we are missing out on some secret sauce that would magically lift our video quality to some clearly higher level of quality.
So in this article I wanted to lay out in plain terms what a lot of that really means so that you can work out easily whether or not those more unusual or pro level codecs would actually apply to what you are doing.
What is a Codec?
Every time you hit record on your camera or phone, it has to have a way of turning the raw data coming from the sensor into a video file that’s small enough to save at a rate that the internal software and storage can keep up with.
After that happens you then need that video file that was created to be formed in a way that the average computer, phone or whatever device can playback that video smoothly.
Finally, and more relevant to the average video maker, that file has to be in a form that can be edited relatively smoothly again, by the average computer or device.
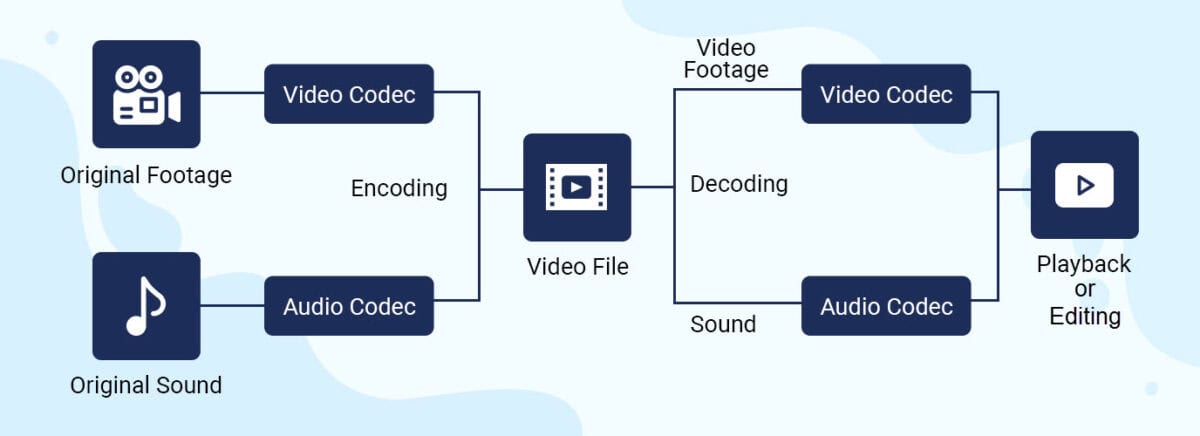
The bulk of the leg work in that situation is being done by the Codec which is a tiny piece of software designed for that purpose.
“Codec” is a shortening of two words which are “encoder” and “decoder.”
- When you record or export a video, the encoder part compresses it into a file.
- When you play or edit that file, the decoder part reads it back and turns it into images on your screen.
Most codecs are actually compression systems: they do whatever they can to shrink the file without losing picture quality.
Some are built to be great for recording (camera friendly), others for editing, and others for delivery (like YouTube or streaming).
Codecs vs. Containers: .mp4 Is Not a Codec!
You’ll often see extensions on video files like .mp4, .mov, .avi or .mxf.
These are containers, not codecs.
Think of a container like a box that has some information written on the outside explaning what the contents of the box are and how those contents were created.
So for example when you click Play on an MP4 file, the information written on the box (container) tells your device that inside the box is a video file and that it will need the H.264 codec to play that video.
Inside that box (container) are:
- A Video stream (encoded with a codec like H.264, HEVC, ProRes, etc.)
- An Audio stream (AAC, PCM, etc.)
- Optional extras like subtitles, timecode, chapters, and metadata.
Why We Need Codecs at All
When you are recording a video regardless of the device, you are actually taking a series of images sequentially which gives the illusion of motion.
If you are trying to write that amount of pure, uncompressed data to the storage media on your camera or phone, there is no way it will be able to keep up!
Even at old school standard definition, the data rate is already huge with uncompressed SD coming in at around around 221 megabits per second!
A 30 minute clip at that rate would be close to 50 GB so even if the device could keep up with the rate at which that data is being created and stored, you would fill your memory cards pretty fast!
Now scale that up to 1080p or 4K and it gets pretty crazy so you wouldn’t fit much on an SD card, your hard drive would fill up in days and your computer would struggle to even play the file back.
Codecs fix this by compressing the video into smaller files that still retain image quality, allow you to record long sessions to affordable cards and you can upload and stream without needing insane internet speeds.
How Codecs Shrink Your Video
We really don’t need to go into the math here (trust me!), but the basic ideas behind how codecs work are worth knowing because you’ll see these terms everywhere.
Bit Rate: How “Fat” the Stream Is
Bit rate is how much data your video uses per second, like “50 Mb/s” or “200 Mb/s” to record the video information.
- A Higher bit rate = more data per second = usually higher image quality.
- A Lower bit rate = smaller files, but the codec has to throw away or approximate more information.
Modern codecs are smarter about squeezing more quality out of fewer bits.
HEVC (H.265), for example, usually looks better than H.264 at the same bit rate or similar at a lower bit rate but as we will see later, that doesn’t make it an automatic choice due to difficulties in editing.
Interframe vs. Intraframe: How Frames Are Stored
Codecs also decide whether to treat every frame separately or reuse information between frames.
- Intraframe compression treats each frame like it is complete unto itself like a JPEG image file.
- Interframe compression stores only some frames as complete with the rest stored as “what changed” from previous complete frames.
We’ll go deeper into this later, because it really affects editing performance.
Lossy vs. Lossless: What Actually Gets Thrown Away
Lossy Codecs (Almost Everything You Use Right Now!)
Most of what you’ll use as a YouTuber or home movie maker is lossy.
That means the codec permanently throws away some information it thinks is unnecessary.
Examples:
- H.264 (very common in cameras, phones, and YouTube).
- HEVC / H.265 (newer, more efficient, used by many cameras and streaming services).
- VP9 and AV1 (used by various streaming platforms).
- ProRes and DNxHR at typical settings (high quality but still lossy).
Each time you re-encode one lossy format to another lossy format, you lose a bit more quality.
That’s why the best practice is to avoid too many “generations” of re-encoding especially from one codec to another.
Lossless Codecs (For When Quality Cannot Slip)
Lossless codecs are more like ZIP files for video: you get back exactly what you put in.
They often work by finding repeated patterns, like big areas of the same color and storing them efficiently.
This works great for graphics and animation, less so for noisy camera footage.
Use cases:
- Converting a weird camera format into something your editor understands without losing quality.
- Archiving footage for high end work.
Interframe vs. Intraframe: Why Your Timeline Stutters
This is one of the biggest reasons some footage feels smooth to edit and other footage makes your timeline crawl.
Intraframe Codecs
Intraframe codecs treat every frame like an individual, complete image.
They are:
- Easy to scrub through and fast to jump around in the timeline.
- Great for frame accurate edits and heavy color work.
- Much larger files because every frame is fully stored.
Examples:
- ProRes 422, ProRes 422 HQ, ProRes 4444.
- Avid DNxHR flavors.
- Some cameras’ “All I”* H.264 or HEVC modes.
Note: The term : “All I” refers to the way the codec creates the file.
Usually these codecs have a choice of three types of frames they can use to record.
They are “I” frames, “B” frames and “P” frames.
I frames are a complete frame unto themselves whereas the B and P frames are only partial frames that contain only information that has changed since the last I frame.
You can direct the codec to use only I frames but this results in much larger file sizes.
Think of it like a flipbook where you can open to any page and the drawing is complete.
Interframe (Long GOP) Codecs
Interframe codecs look at a whole Group of Pictures (GOP) at once.
- They store a full “key” frame (I frame) every so often.
- The frames in between may only store motion and changes (P frames, B frames).
This is fantastic for saving space:
Talking head videos with a static background compress extremely well.
Landscape shots with little motion also compress very efficiently.
But there’s a catch:
Your computer has to decode multiple frames just to show you one, which can make scrubbing and playback choppy on slower machines.
Many cameras use “IPB,” “Long GOP,” or highly compressed HEVC modes and fall into this category.
For a more complete understanding of this. the linked article explains the entire process of simple terms : Editing Problems Explained
Bit Depth: 8 Bit vs. 10 Bit
When you see “8 bit” or “10 bit,” it’s describing how many steps each color channel can have in your video.
- 8 bit: 256 levels per channel (red, green, blue).
- 10 bit: 1,024 levels per channel.
Why it matters:
8 bit is fine for a lot of YouTube content, but you can get banding (ugly stripes) in gradients like skies or soft light.
10 bit gives the codec more headroom and smoother gradients, which really helps if you like to color grade or shoot in log profiles.
Many broadcast and streaming specs for professional delivery now expect 10 bit 4:2:2 as a baseline, but for home and YouTube use, 8 bit H.264 is still extremely common.
Chroma Subsampling: 4:4:4, 4:2:2, 4:2:0
Chroma subsampling is another way codecs save space: they reduce color resolution more than brightness resolution, because your eyes are more sensitive to brightness.
You’ll see this written as three numbers, like 4:4:4, 4:2:2, or 4:2:0.
4:4:4: Full color information for every pixel. Best quality, largest files, often used in high end post and VFX.
4:2:2: Half the horizontal color resolution. Very common in professional cameras and codecs, a great quality/size compromise.
4:2:0: Half horizontal and half vertical color resolution. This is what most consumer cameras, phones, and streaming services use.
For the Average User:
4:2:0 8 bit H.264 is absolutely fine for most talking heads, vlogs, and home movies.
4:2:2 and 10 bit become more important if you’re keying green screen, doing heavy color work, or delivering to picky clients.
Hardware Compatibility: Why Some Files Play Smooth and Others Don’t
Not all video is equally easy for your computer to decode and deal with and even more so when it comes to editing.
Modern CPUs and GPUs often have hardware decoders for popular codecs like:
- H.264 (almost everything can play this comfortably now).
- HEVC / H.265 (supported on many newer devices, but not all).
- AV1 (increasingly common, but still rolling out).
Complex codecs at high resolutions and bit depths (for example, 4K 10 bit HEVC long GOP) can:
- Stutter and lag on older machines.
- Make scrubbing timelines painful, even though the files are relatively small.
Quick fixes if your footage is choking your system:
Generate proxies: low res, easy to decode files you edit with, then relink to the originals for export.
Transcode everything to an intraframe codec like ProRes or DNxHR before editing.
Capture, Edit, Deliver: Where Each Codec Fits
An easy way to think about codecs is to split your workflow into three stages.
Capture (What Your Camera Records)
This is the codec your camera or phone uses on the card.
Typical consumer/YouTube options:
- H.264 8 bit 4:2:0 in an .mp4 or .mov file (most phones and entry level cameras).
- HEVC 10 bit (on newer cameras and phones) for higher efficiency and better color depth.
Higher end/hybrid cameras may offer:
- All I H.264 or HEVC modes.
- ProRes or DNxHR internally, or via an external recorder.
When choosing a capture codec, ask:
- Will I be doing heavy color grading or VFX?
- Do I need small files, or can I afford big ones for better quality?
- Can my computer actually edit this codec smoothly?
Editing Codecs
As mentioned peviously, the re-encoding of digital video files created with one codec like H.264 to another will generally result in at least some degree of loss of quality.
There are codecs that you can use to do this that are designed to actually not lose quality and make editing easier for your computer but!
This is really adding an extra step that is possibly not even necessary.
The only time this may be applicable at the below “Hollywood” level is if you intend to apply heavy color correction and or grading or want to apply very, very advanced special effects.
My view on this is that it is unnecessary for the average user.
If your computer is struggling with your existing files then just generate proxies.
Just about every video editing software I am awre of currently is set up to do this easily.
How to Choose a Codec for Your Own Projects
Here’s a simple way to decide, as a YouTuber or home filmmaker.
Ask yourself where will this video live?
- YouTube, social, friends and family → H.264 is usually fine.
- Festivals, broadcast, demanding clients → check their specs; they may require 10 bit 4:2:2 and specific formats.
How much are you grading?
- Just cutting and maybe adding a LUT → 8 bit 4:2:0 H.264 or HEVC is okay.
- Heavy grading, log profiles, stylized looks → aim for 10 bit, ideally 4:2:2, and consider intraframe or high quality long GOP.
How much storage do you have?
- Limited storage or SD cards → use efficient codecs (H.264/HEVC) at sensible bit rates.
- Plenty of space and fast drives → feel free to use ProRes or DNxHR where available.
How powerful is your computer?
- Older/weak machine → avoid heavy HEVC long GOP as your main editing format; use ProRes/DNxHR or proxies.
- Newer system with good hardware decoding → you can comfortably edit more complex codecs directly.
Do you need a future proof master?
If yes, export and keep a high quality mezzanine file (like ProRes 422 HQ) that you can always re encode from later.
A Few Real World Setups You Can Copy
Here are some practical “recipes” you can adopt.
Average video for a YouTube channel, light color work
- Capture: H.264 8 bit 4:2:0 at a sensible bit rate (e.g., 50–100 Mbit/s for 4K).
- Editing: Edit natively; if it’s slow, generate proxies.
- Delivery: H.264 .mp4 for YouTube.
Short film or cinematic travel video with serious grading
- Capture: 10 bit 4:2:2 (HEVC or All I, or ProRes if your camera supports it).
- Editing: Transcode to ProRes 422 or DNxHR HQX for smooth grading.
- Delivery: High bit rate H.264/HEVC for upload; keep a ProRes mezzanine master.
Home movies you just want to shoot and share
- Capture: Whatever your phone/camera defaults to (usually H.264 or HEVC).
- Editing: Use proxies if you need them; otherwise edit natively.
- Delivery: H.264 .mp4, exported straight from your editor, uploaded to YouTube or stored on a drive.
The Bottom Line?
The reality of creating videos at a YouTube or home user level is that you are most likely recording your videos on a mobile device or an average camera.
As such you will already be using the H.264 or H.265 (HEVC) codec to do that.
In addition to that you are probably using an app on your phone or a home computer to edit those video files.
Your requirements as far as color correction, color grading, special effects etc. are quite modest compared to a Hollywood blockbuster!
You will ultimately be creating the final video for uploading to a site like YouTube or maybe sharing with friends, both of which are best served by the codec you started with!
So in the end all of the above whilst intersting to know (maybe?) is basically irrelevant to the actions you are engaging in!
Don’t get sidetracked by people claiming that this codec or that codec will make a huge difference at you level… it simple won’t and will most likely add complication to a relatively simple process.
Leave a Reply