As an average home movie maker one of the most common problems you will face is that of achieving a reasonable level of audio quality especially with regards to reducing wind noise in your outdoor shots.
Now I know all the experts insist that in order to get good sound you need to either record using an external microphone or even use a stand-alone audio recording device altogether.
While this may be excellent advice it fails to take into consideration the reality of the conditions under which most of us are trying to get our footage.
No-one really wants to be that poor sap on holidays with the family, desperately lugging around all sorts of junk for the purpose of getting some good video of the holiday.
In fact the result of doing it like this is usually that Mr. Cameraman doesn’t actually participate in the holiday but merely hangs around in the background trying to shoot and record it.
It is not actually until he gets home and watches the footage on a computer screen does he really get to see what happened and whether we all had a good time or not!
So my view on this is that yes, it is true you should record your sound that way but, if you still want to part of the fun then some kind of compromise needs to occur.
For me that compromise is to go ahead and use the on-board microphone of my camcorder because these microphones usually do a “not bad” job of recording.
Unfortunately the one area that they are prone to disaster is that of wind noise.
I don’t know if it is because of their design, shape, position or what the problem is but sometime I swear if a sparrow farts in the general direction of the camcorder the microphone will utterly fail to pick up the sound but will somehow manage to record some kind of whooshing, crackling noise as the air moves over it!
In light of this and because at the time I was about to go on a holiday I decided to do some research online to find some way of building my own wind-noise reduction solution that was cheap and easy to put into action.
What I found was that if you do a little looking around the internet you will find there are quite few videos and sites offering advice on the subject and most of them are pretty good.
As far as the ones that really work go almost all of them suggest using “open cell foam” as the basis for the wind-noise suppressor. They then go on to tell you that you can get this type of foam in the form of packing material and a million other places.
The problem for me was that I had no idea what open cell foam was and exactly which one was the best to use.
In light of that and given that I had time to do it I put on my mad professor hat and decided to go into testing mode to see which foam actually worked best at cutting wind noise for my camcorder.
I won’t bore you with all the details but eventually I came up with a solution that not only works unbelievably well at cutting out wind noise but is made with a type of foam that everyone can get hold of easily and very cheaply.
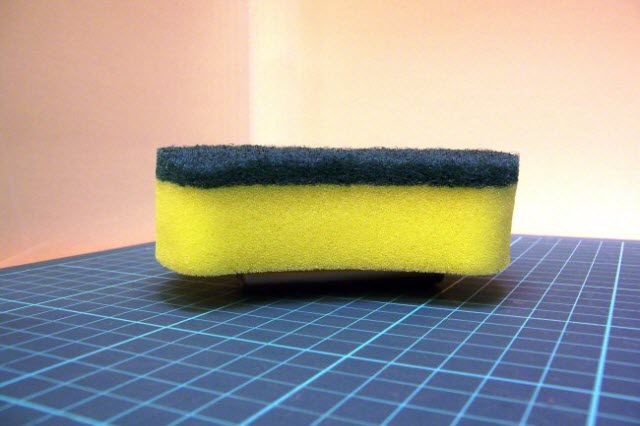
So the question is, “What is this rare and elusive open cell foam” substance for making a wind suppressor? Well… this is it!

Yes, that’s right it’s one of those yellow foam scrubby thingys that you use in the kitchen for washing up!
Apparently the reason it works so effectively is that the foam is not just “open cell” but also because they have a very small, very densely packed structure.
Once I had found the ideal foam it then just became a matter of using a box cutter to shape the noise reducer and then attaching it to the camcorder or still camera being used.
Some people recommended just gluing the thing on but I didn’t really want to do that. Others suggest using adhesive tape over the foam but I found that doing it like that cut out a lot of the audio that I wanted.
I tried using reusable adhesive putty and although this was pretty good for the very tiny still-camera microphone openings it fell over on the camcorder because the opening was larger and the foam lacked the stiffness to hold on very well.
So finally I came up with this:


To do it I took a piece of white cardboard (not too thick) and placed it over the microphone opening. I then traced around the general shape of the opening with a pencil.
I used the cardboard initially because it was easy to work with and I could keep placing back in position and make adjustments as I went along.
Using a pair of fine scissors and a box-cutter I carefully cut away the cardboard until I had the outside shape right.
Then I started carefully cutting out the center part that would go over the microphone holes on the camcorder until I eventually had a little frame.
Once the cardboard frame was how I wanted it I used that as a template to cut out the exact same shape using an old credit card until I had another frame made out of credit card thickness plastic.
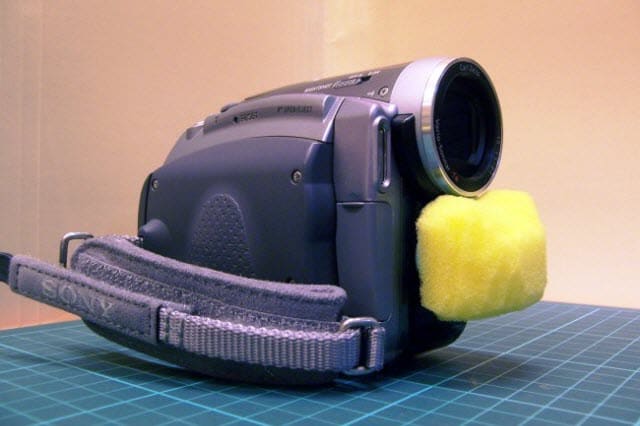
All I had to do then was glue the foam to the frame and use reusable adhesive putty to attach the wind-noise suppressor to the camcorder. This use of adhesive putty allowed me to attach or remove the wind noise suppressor whenever I wanted.
I am sure you may be able to think of another way to do this but the important point to keep in mind is that easily the best foam I have found for the purpose that is easy to get hold of is the one use in the photos above.
To see… or hear just how effective it is, play the video below and listen to the audio. Remember this was recorded on a simple handheld camcorder (a Sony HC90), off the coast of Kotakinabalu on a windy, windy day in a boat going at top speed across the bay to an island.
You can actually “see” in the video how much wind there was but more importantly there is almost no wind noise. You can hear the engine and the sound of the water slapping at the sides of the boat but just about no wind noise.
Demonstration video of a home made wind noise suppressor.
I think you would have to agree that given the strength of wind occurring here the degree by which my little foam noise reducer cuts out the wind is pretty impressive!
Discover more from The DIY Video Editor
Subscribe to get the latest posts sent to your email.
Leave a Reply