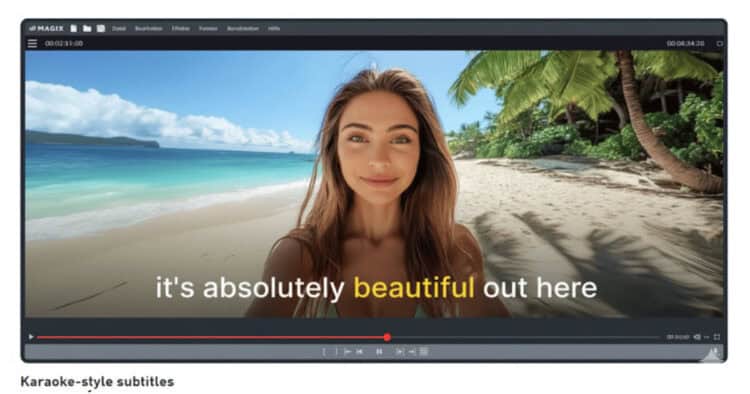
Highlighted Subtitles with Magix Video Deluxe 2026
One of the video editing software programs I have recommended for quite a while now has been the one from Magix.
Over the years it has had a few different names mainly because Magix purchased other software along the way and were trying to maintain connection to those they had absorbed.
For example it was Magix Movie Studio for a while because they had bought out the Sony Creative line of editors and that software was called Movie Studio.
That all seems to be behind them now and they have settled on the Video Deluxe moniker.
The software itself has always been very good but one thing that tends to keep them somewhat in the background is that they are a German company with a smaller footprint in the North American market.
Anyway I have just had a chance to revisit the program for the 2026 version and it really is a clean, no nonsense editor with great features.
Here’s a look at it using the “Speech to Text” animated subtitles feature to give you an idea.
5-Minute Video Editing – A Guide That Actually Works – Movavi Video Editor
One of the most common ways people “fall” into the whole world of video editing and creating content is sort of “reaction” based.
What I mean by that is that they have a desire to make a video thinking it might be fun or for whatever reason.
They “react” to that urge by grabbing a phone or camera and shooting some footage.
They dump that footage into an editor and realize that the footage isn’t really suitable or complete so the project gets kind of stalled.
On top of that they realize the audio is pretty bad which is something they didn’t really account for.
To each of these sudden problems, they “react” and find a way around them or solutions to them.
By the time they have completed a few projects they have developed a workflow that is based on reactions to problems.
On the surface this may seem OK but in the long run it almost always results in an inefficient and most importantly, unsustainable process.
Pretty soon the frustrations set in and it all goes a bit flat!
That’s why whenever I find a good, solid workflow tutorial I always post it here on the Friday Roundup.
Even if you think you have a pretty good workflow you should still do what I do and just quickly look at other suggestions to see if maybe yours could stand a polish.
YouTube’s Free AI Video Generator Just Got a Huge Update
OK so full disclosure here!
I don’t use any of these mobile / smartphone video editing or even A.I. video creation tools.
It’s not because I am some kind of grumpy old fart railing at those kids hanging around on the corner like I am grandpa Simpson or anything!
It’s just that the videos I work on for myself and my clients just don’t use those tools or features.
However in the interests of completeness here’s video from the guys at Primal Video on the latest and greatest regarding the YouTube video generator.
The Simplest Way To Spotlight A Player – PowerDirector
There are a bunch of ways to highlight a particular object or person in any video clip using PowerDirector.
Some of these could be described as being more elegant than others but in reality there are time when you just want to get the job done.
Not every project actually requires that you try to perform some kind of Hollywood magic on what is essentially a simple task.
So here’s how to do it… simply.
Linear, Image, & Shape Masking – PowerDirector Basics
Another in the recent series of basic tutorials on how to use CyberLink PowerDirector.
Given the (frankly, quite welcome) changes in the interface over the past year these new tutorials are a great asset for anyone new to the software.
In fact they are pretty good for anyone actually.
How to Use Green Screen & AI Background Remover – PowerDirector Basics
Up until A.I. features started making their way into consumer video editing software, pretty much the only way to remove a background was through the use of chroma-key or green screen.
As software developed those green screen modules became more accurate but they still relied on you getting a good solid key when shooting your footage.
These days whilst we still have that tools we also have A.I. models that can very accurately identify subjects, separate them from backgrounds and remove that background.
In my experience neither alternative is always perfect.
Usually it depends on the quality of the footage and its composition as to which method is going to work best.
I usually give both systems a try and choose the one that gives the best results.
How To Animate Objects Along A Curved Path In Filmora
One of the “unseen” actions that occurs when you use keyframes to make an object move in Filmora is that in fact a motion path is created.
Of course at its basic level that motion path is a straight line so there is no real need for the software to display that.
However if you check the video below you can see that you can not only display that motion path but can also adjust it to have different properties such as curves.
OpusClip – Why I finally said Yes
This is an interesting post from Daniel Batel this week covering a service he is testing out called OpusClip.
Essentially it is an A.I. driven service that can re-purpose long form content intelligently into short form for posting to social media.
On top of that it also has the ability to digest large amounts of footage and assemble it into content again, using A.I.
There are a few services and features out there at the moment that do this so I thought it might be interesting to follow along with Daniel while he checks this one out.
Discover more from The DIY Video Editor
Subscribe to get the latest posts sent to your email.
Thanks for this roundup! The breakdown of the Magix Video Deluxe subtitle feature was really clear. Animated captions really do make a difference for engagement.