Audio Processing for Voice-overs in Videos: A Beginner’s Guide with Audacity
When it comes to video production audio quality is often an overlooked aspect that only becomes apparent when you play back you masterpiece and realize it sounds awful!
Poor audio quality can spoil an otherwise good video making information difficult to digest or the story hard to comprehend and overall causing viewer disengagement.
The general rule is that an average looking video with a good message and good sound quality will hold attention quite well.
However, a beautifully shot an edited video with a good message and poor audio will lose attention almost immediately.
From this we get the age-old adage: The most important part of video is audio!
In this guide I want cover the importance of audio quality, define basic audio processing terms and provide a step-by-step workflow using the free audio editing software, Audacity.
I have chosen Audacity as the Digital Audio Workstation (DAW) to illustrate my points for a couple of reasons.
The first is that it is Free! Can’t beat that!
The second is that even though it is free it is a fully developed cross platform software that has almaost all of the capabilities of comparable paid alternatives.
There is absolutely no point in anyone moving up to a more professional (paid!) program unless you have fully mastered Audacity and feel it is holding you back.
Hopefully after reading this and putting the steps into action you should be well on your way to producing high-quality voiceovers for video projects.
The Importance of Audio Quality
Clarity
Clear and articulate audio ensures that your message is easily understood by your audience.
If your voiceover is muffled, plagued with background noise or distorted, the core message can get lost.
On the part of the viewer this causes frustration in that they are “reaching” to comprehend if only subconsciously resulting in disengagement
Professionalism
High-quality audio lends a sense of professionalism or polish to your video.
It shows that you have invested time and effort into producing content that respects your audience’s expectations.
This attention to detail builds trust and credibility while at the same time causing your audience to sit back, relax and take in the content.
Engagement
Engaging content relies not just on visual appeal but also on easy-to-listen-to audio.
Distracting noise, inconsistent volume or poor sound quality will pull viewers out of the experience reducing the likelihood that they will stay engaged or watch future content.
Accessibility
Clear audio is easier to transcribe and caption making your content accessible to a broader audience, including those with hearing impairments.
This inclusivity can expand your viewership and ensure that your message reaches as many people as possible.
Basic Audio Processing Terms
Before diving into the specific workflow, I am going to outline in Audacity, it’s essential to familiarize yourself with some basic audio processing terms:
- Waveform: A visual representation of the audio signal’s amplitude over time. In Audacity, this is depicted as a series of peaks and troughs.
- Sample Rate: The number of samples of audio carried per second, measured in Hertz (Hz). A common sample rate for high-quality audio is 44.1 kHz.
- Bit Depth: The number of bits of information in each sample, which affects the dynamic range of the audio. Common bit depths are 16-bit and 24-bit.
- Amplitude: The volume or loudness of the audio signal.
- Frequency: Measured in Hertz (Hz), it determines the pitch of the sound. Human hearing ranges from 20 Hz to 20 kHz.
- EQ (Equalization): The process of adjusting the balance between frequency components. EQ is crucial for enhancing voice quality.
- Compression: Reducing the dynamic range of an audio signal to make the quieter parts louder and the louder parts quieter.
- Noise Reduction: Removing or reducing unwanted background noise.
- Normalization: Adjusting the audio signal to a standard level of amplitude, ensuring consistent volume.
Getting Started with Audacity
Audacity is a free and open-source audio editor that offers a wide range of features suitable for beginners and advanced users alike.
As already mentioned, the reason I have chosen it for this example is that although it is free it has fully professional features which are more than enough to get yourself started.
On top of that most DAWS (Digital Audio Workstations) follow pretty much the same layout and use the same terminology so even if you end up using something else a grounding in Audacity will serve you well.
Step 1: Download and Install Audacity
First, download Audacity from its official website.
Follow the installation instructions for your operating system (Windows, macOS, or Linux).
Once installed, open Audacity to start your project.
Step 2: Importing Your Audio File
To import your audio file, follow these steps:
Go to “File > Import > Audio” or simply drag and drop the audio file into the Audacity window.
Select the audio file you want to work on.
Audacity supports various formats, including WAV, MP3, and AIFF.
After importing, you will see the waveform of your audio file displayed in the Audacity workspace.
Although Audacity as mentioned handles a wide range of file types the best type to work with is by far is the WAV format.
The reason I recommend this is that the WAV format is quite common and is not highly compressed such as formats like MP3.
Compression in an audio file can introduce unwanted artifacts and some weird sounds after you try to process them so it’s best to stick with WAV.
Most common video editors will allow you to export the audio from your project as a WAV file then once cleaned up you can import it back in.
A Note on Audio Editing Workflow
Most modern video editing software will only offer some of the features you will have access to in Audacity.
They are improving over time but they still either lack the features or those features are not delivered at the standard of Audacity.
The recommended workflow is that you load your video assets on to the timeline of your chosen video editing software and work on that until you are satisfied with what you have and will be making no further cuts to the video.
At that point you can export the voiceover portion as a file in the WAV format and import it into Audacity.
Once you have completed your steps in Audacity you can then export the processed voic-over as a WAV file and import it back into your video editing software.
After that you need to mute the original voiceover, drag the new audio on to the timeline and you are ready to go.
As a precaution your editing software will offer the ability to “lock” the video and (new) audio together as they will now occupy separate tracks in your timeline.
The reason nearly all good video editing software offers this ability is so that any more cuts or adjustments you may make to the video track will also be applied to the audio track ensuring synchronization of video and voiceover audio.
Step 3: Noise Reduction
Background noise can be a significant distraction which is especially true in voiceovers.
For the purposes of this tutorial when I am referring to “voiceovers” I am referring to any spoken word audio that is either part of the original video or was recorded separately.
Here’s how to reduce noise using Audacity:
Select a Noise Profile
Highlight a segment of the audio that contains only the unwanted noise (no speech).
Go to Effect > Noise Removal and Repair > Noise Reduction, then click ‘Get Noise Profile.’
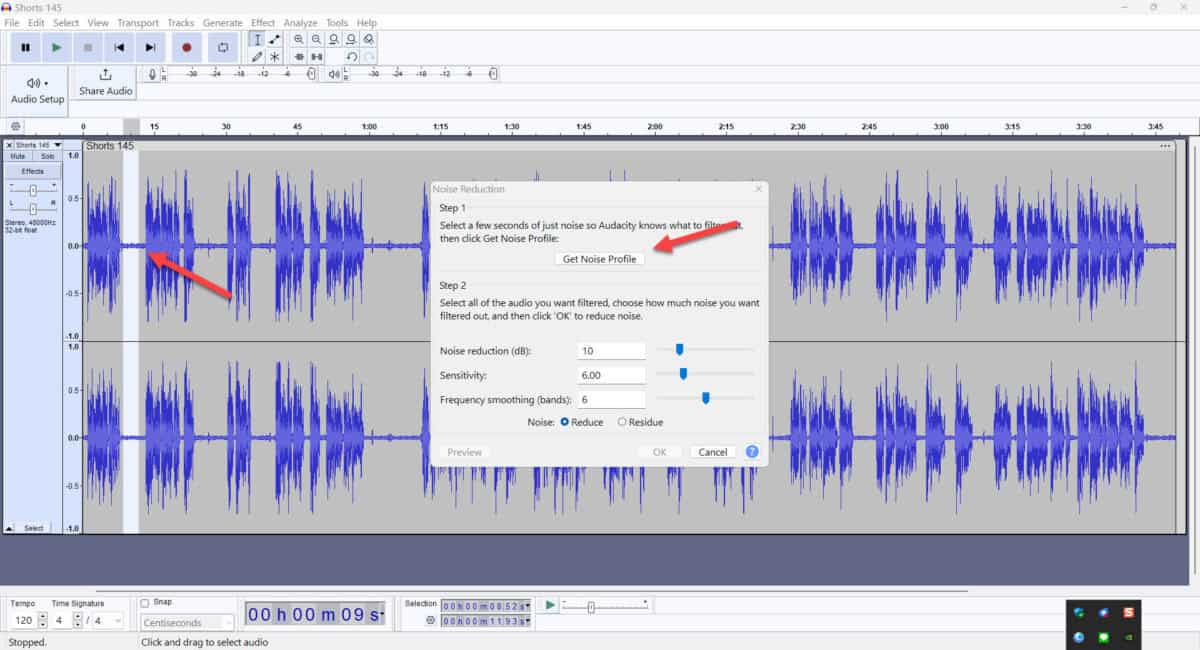
Apply Noise Reduction:
Select the entire track or the specific part you want to clean up.
You can click and drag to select, simply hit ctrl A to select all or click on the area indicated in the image below to select all.
Go back to Effect > Noise Reduction > Noise Removal and Repair >and click ‘OK.’
Start with default settings as they are usually OK for most instances but don’t hesitate to experiment for better results.
There are many, many tutorials available online for what these settings are and how they are used.

Step 4: Equalization
EQ is essential for enhancing the quality of the voice and ensuring that it sounds clear and natural.
- Select the entire track or the portion you wish to adjust.
Make sure you listen carefully to any proposed changes and preferably use headphones so that you can clearly hear what is going on.
- Go to Effect > Graphic EQ or Effect > Filter Curve EQ.
- Adjust the sliders to boost frequencies that enhance the voice (typically between 80 Hz and 3000 Hz), while cutting frequencies that introduce muddiness or harshness.
For instance:
Boost around 100-300 Hz for warmth.
Boost around 1000-3000 Hz for clarity and presence.
Cut around 300-500 Hz to reduce muddiness.
- Audacity allows you to preview the changes before applying them so take advantage of this feature to fine-tune your adjustments.
Step 5: Compression
Compression helps in smoothing out volume spikes and bringing quieter parts of the audio to a more consistent level.
- Select the entire track.
- Go to **Effect > Volume and Compression > Compressor.
- Set the Threshold to around -20 dB and the Ratio to 2:1 or 3:1 as a starting point.
Adjust the Attack and Release times as needed. Attack time should be short (10ms-20ms), and Release time should be longer (100ms-200ms).
Click ‘OK.’
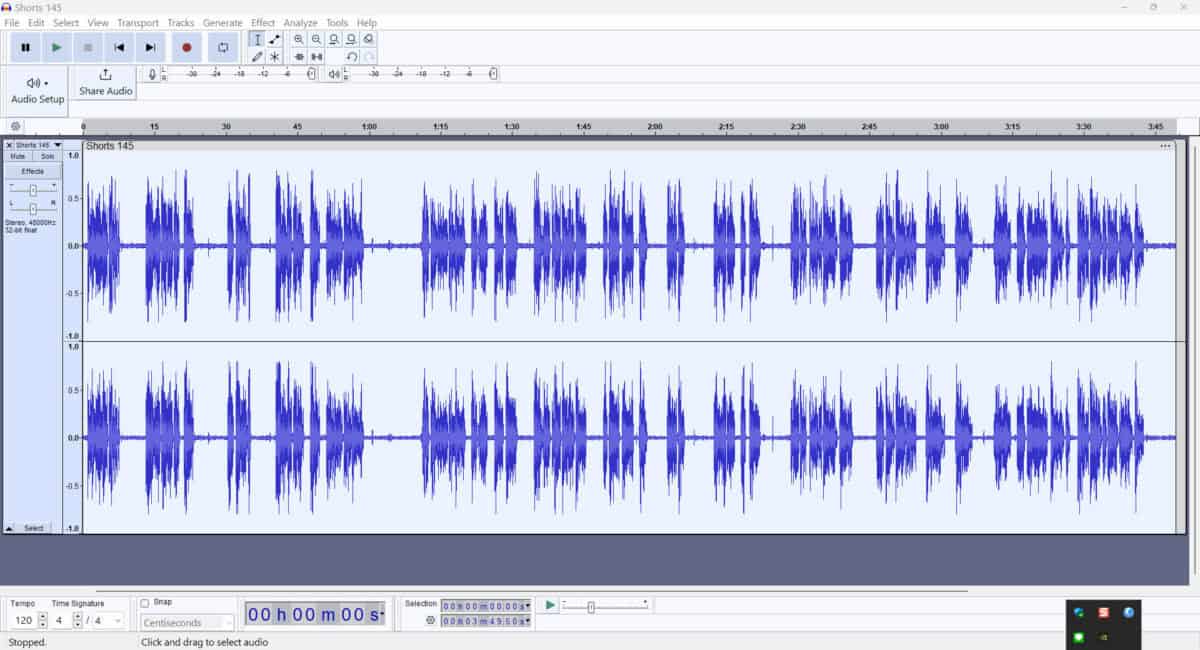
As you are applying the changes watch the waveform pattern on the screen and how it changes.
What you are looking for is that any noticeable spikes in volume are brought down so that you now have a more even waveform pattern.
Compare these two image to see that before compression there were a few peaks that would have been noticeable volume “jumps” in the track.
After compression those peak are gone and we have a more consistent volume level.


Step 6: Normalization
To ensure your audio is consistently loud enough without causing clipping (distortion due to exceeding 0 dB):
- Select the entire track.
- Go to Effect > Volume and Compression > Normalize.
Make sure “perceived loudness” is selected and set the peak amplitude to -15 LUFs (Loudness Units Full Scale) as shown in the image below.
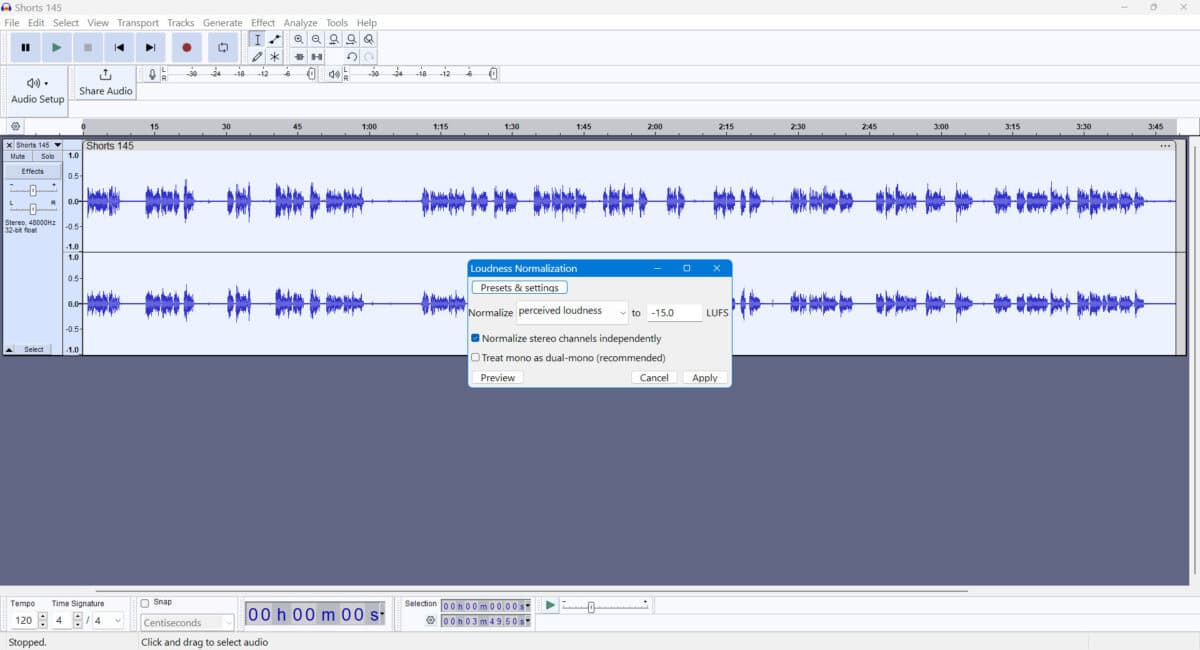
As a side note here, we are setting for -15 LUFs for a specific reason.
This is the standard for most online video sites like YouTube and will help you avoid having your file re-processed once it is uploaded.
Outside of that it is a perfectly acceptable level to aim for.
Step 7: Limiting (Provisional)
After applying a -15 LUF normalization it may be that you now have vertical red lines visible on the waveform.
These lines indicate that your track is now clipping (too loud) and there will be distortion at those points.
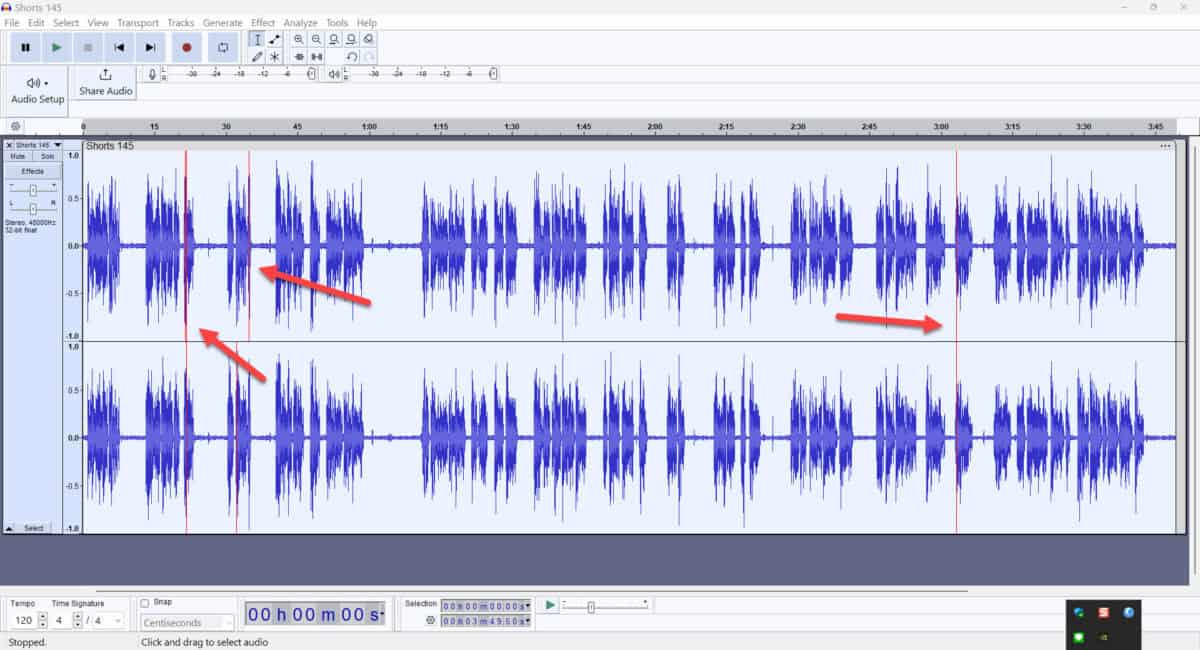
Again, because we want to adjust for what is an industry standard we can applying a Limiter to the track to just pull those clipping points down without affecting the entire track.
- Select the entire track or a portion.
- Go to Effect > Volume and Compression> Limiter.
- Simply set it as shown in the image below with the main point being to set it to a “Hard Limit” and the “Limit to (dB) set to -2dB.
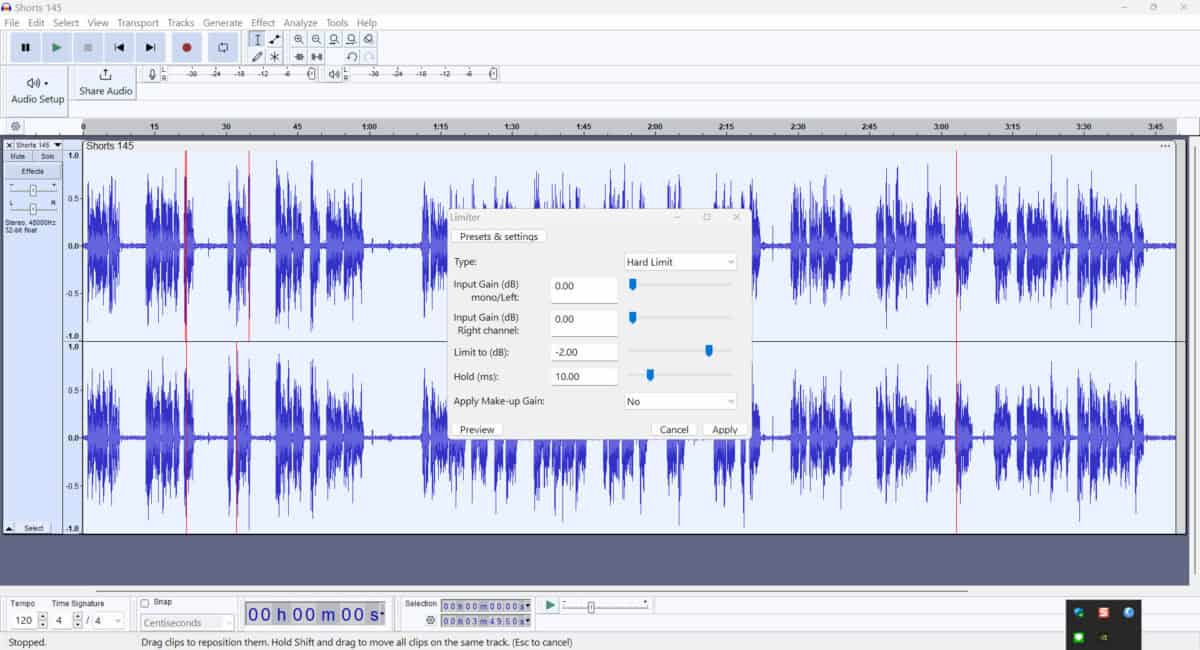
This will just pull down any clipping and leave everything else untouched as you can see in this image.
Step 8: Final Listening and Adjustments
Before exporting your final audio, listen to the entire track with headphones and speakers to ensure the quality is consistent across different listening devices.
- Make any final adjustments to volume levels, EQ, or apply additional noise reduction if necessary. Sometimes when you Normalize the volume previously unnoticeable background noise becomes apparent.
- Use Audacity’s Mixer Toolbar to ensure tracks are balanced if working with multiple tracks.
Step 9: Exporting Your Final Audio
Once you’re satisfied with the edits, you’ll need to export your audio file:
- Go to File > Export Audio.
- Choose the format you prefer (WAV for high quality, MP3 for smaller file size).
- Name your file and select the destination folder.
- Click ‘Save.’ For MP3 files, Audacity will prompt you to enter metadata (tags). This is optional but useful for organizing your files.
Tips for Better Voice-over Recordings
Whilst all of the steps outlined above provide what you need to get your audio into shape, the entire process can be improved exponentially by starting off with well recorded audio in the first place.
Producing high-quality voiceovers starts with good recording practices so ere are some tips to ensure the best possible raw audio:
Use a Good Microphone
Invest in a reasonably good external microphone.
By “external” I mean one that is not a part of the smartphone, computer or camera that you are using to record in the first place.
Those built-in solution although OK in a pinch never give great quality whereas with an external mic you can exercise far greater control.
The ones I use are shown below and for the price provide great quality audio that is very easy to clean up in Audacity.
For a more in-depth look at different types of microphone and their uses click this link: Different Types of Microphone.
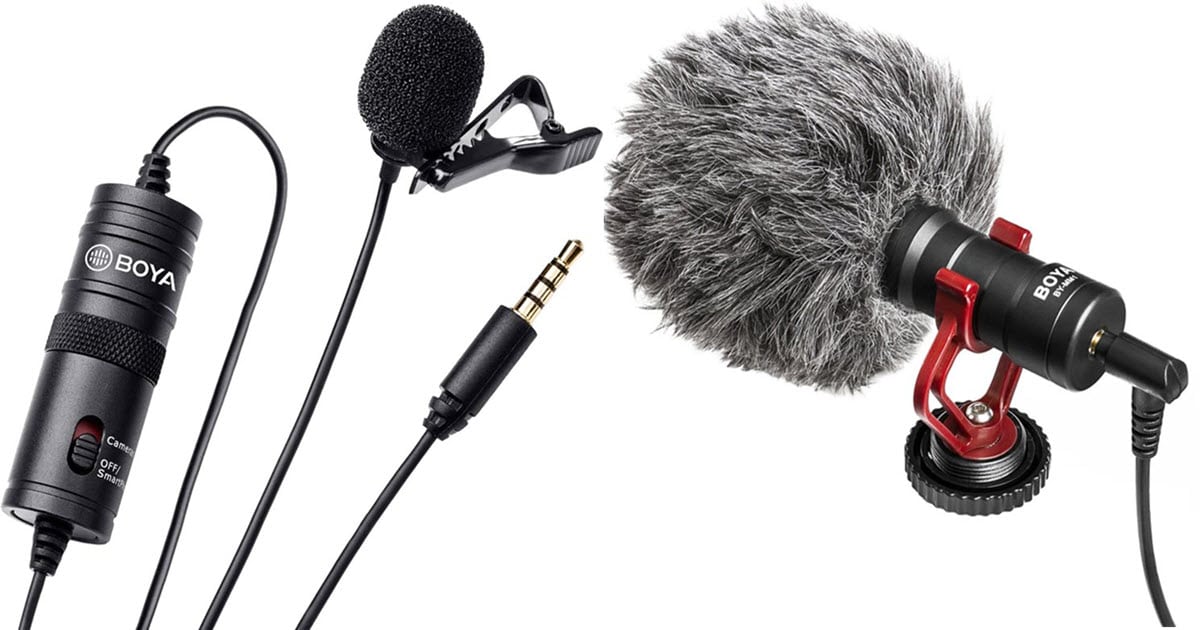
Boya Lavalier Microphone – Boya Shotgun Microphone
Record in a Quiet Environment
Choose a recording space that minimizes background noise as much as possible.
Even though Audacity has great noise reduction features it is always better to keep these “correction” steps to a minimum.
Close windows, turn off noisy appliances, fans, air conditioners and use heavy curtains or blankets to dampen sound reflections.
Proper Mic Technique
Position the microphone about 6-12 inches (15-30 cm) from your mouth.
Use a pop filter to reduce plosive sounds (like ‘p’ and ‘b’).
Speak across the microphone rather than directly into it to minimize breath noises.
Monitor Levels
Use headphones to monitor your recording levels and ensure you’re not peaking (clipping).
Aim for levels between -6 dB and -12 dB to leave headroom and avoid distortion.
Consistent Position
Maintain a consistent distance from the microphone throughout the recording to ensure even volume levels.
Warm Up Your Voice
Warm up with vocal exercises before recording to ensure your voice is clear and strong.
Hydrate yourself with water, but avoid dairy and caffeine as they can affect your vocal clarity.
Record Multiple Takes
Record multiple takes of each script segment and rehearse the dialogue prior to recording.
This gives you more options to choose from and makes it easier to piece together the best parts during editing.
Wrap Up
While this guide provides a solid foundation, mastering audio processing takes practice, patience and constant learning.
Don’t be afraid to experiment with Audacity’s various effects and settings and continually refine your techniques to achieve the best possible results.
Leave a Reply