Introduction to Video Color Correction
The Importance of Color Correction in Post-Production

Video color correction is an indispensable step in the post-production process that ensures the visual consistency and accuracy of a video.
Post production refers to any part of your video creation process that occurs after you video has been shot and begins at the editing stage.
It involves adjusting the white balance, exposure, contrast and other factors to make appearance of the footage appear natural.
This process is crucial for maintaining a professional look as often raw footage may appear flat or incorrectly balanced.
By correcting colors we aim to replicate the way the human eye perceives the world ensuring that whites appear white, blacks appear black and all colors in between are true to life.
Without color correction videos can seem amateurish or distract the viewer from the content diminishing the impact of the narrative.
Color Correction vs. Color Grading: Understanding the Difference
While often (incorrectly) used interchangeably, color correction and color grading serve different purposes.
Color correction is the technical process of fixing imbalances in an image to achieve a natural and consistent look across all shots.
It’s about making sure the footage looks exactly as it should with accurate colors that reflect reality.
On the other hand color grading is a creative endeavor that always follows color correction.
It involves stylizing the footage to convey a particular mood or tone enhancing the storytelling aspect of the video.
Color grading can transform the visual narrative giving it a unique aesthetic that aligns with the director’s vision or the genre of the project.
The Role of a Colorist
A colorist is a professional who specializes in color correction and grading.
They possess a deep understanding of color theory and are adept at using software tools to manipulate the hues and tones of a video.
Colorists work closely with directors and cinematographers to ensure that the final product reflects the intended visual style.
Their expertise allows them to balance and enhance colors, making the footage more appealing and emotionally resonant.
The colorist’s role is both technical and artistic requiring a keen eye for detail and a creative touch to bring a video to life.
In summary, video color correction is a fundamental aspect of post-production that ensures the visual quality and consistency of a project.
It sets the stage for color grading where a colorist can creatively stylize the footage to support the narrative.
Understanding the distinction between correction and grading as well as the role of the colorist, is essential for anyone involved in video production.
Understanding Color Theory and Video Scopes
Basic Concepts of Color Theory

Color theory is a fundamental concept used in a variety of visual mediums, including video.
At its core it involves the mixing of colors, the visual effects of specific color combinations and the emotional impact colors can have on viewers.
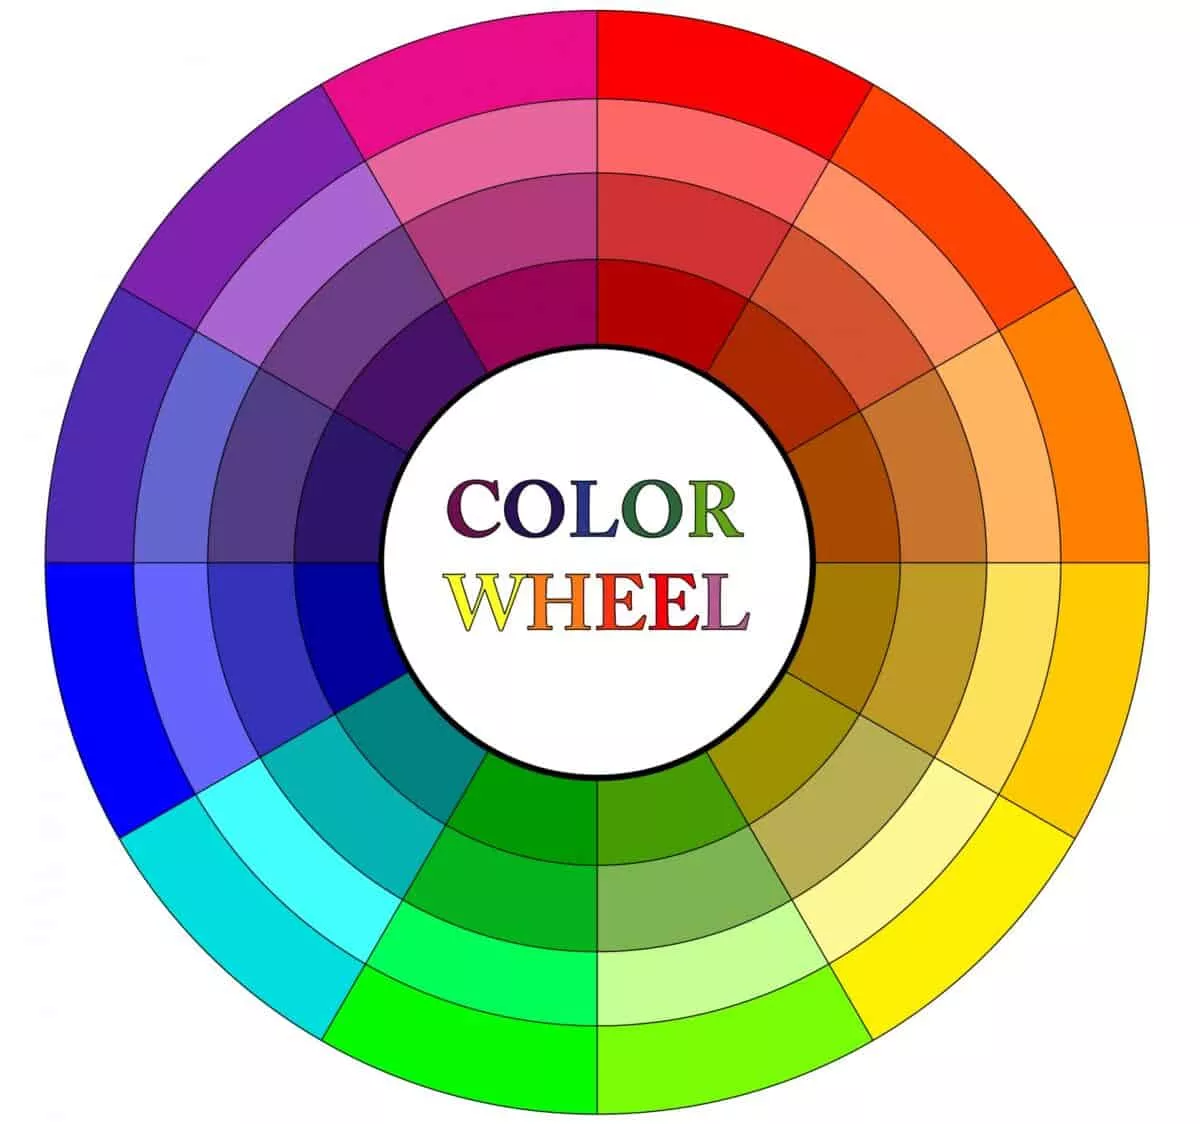
The color wheel, a visual representation of colors arranged according to their chromatic relationship, is a crucial tool in color theory.
Primary colors (red, blue, and yellow) are the basis from which all other colors are derived.
Secondary colors (green, orange, and purple) are created by mixing primary colors. Tertiary colors are produced by mixing primary and secondary colors.
Understanding color theory is essential for color correction because it helps in making informed decisions about how to adjust colors to achieve a desired look or correct issues in the footage.
For instance, complementary colors which are opposite each other on the color wheel can create vibrant looks when paired together, while analogous colors, which are next to each other on the color wheel, tend to produce harmonious and pleasing results.
Introduction to Video Scopes

Video scopes are essential tools in color correction that provide a graphical representation of the color and luminance (the intensity of the color) information present in a video signal.
They help colorists ensure consistency and accuracy in their work as the human eye can be easily deceived by various factors such as ambient light or monitor calibration.
How to Read Waveform, Vectorscope, and Parade Scopes
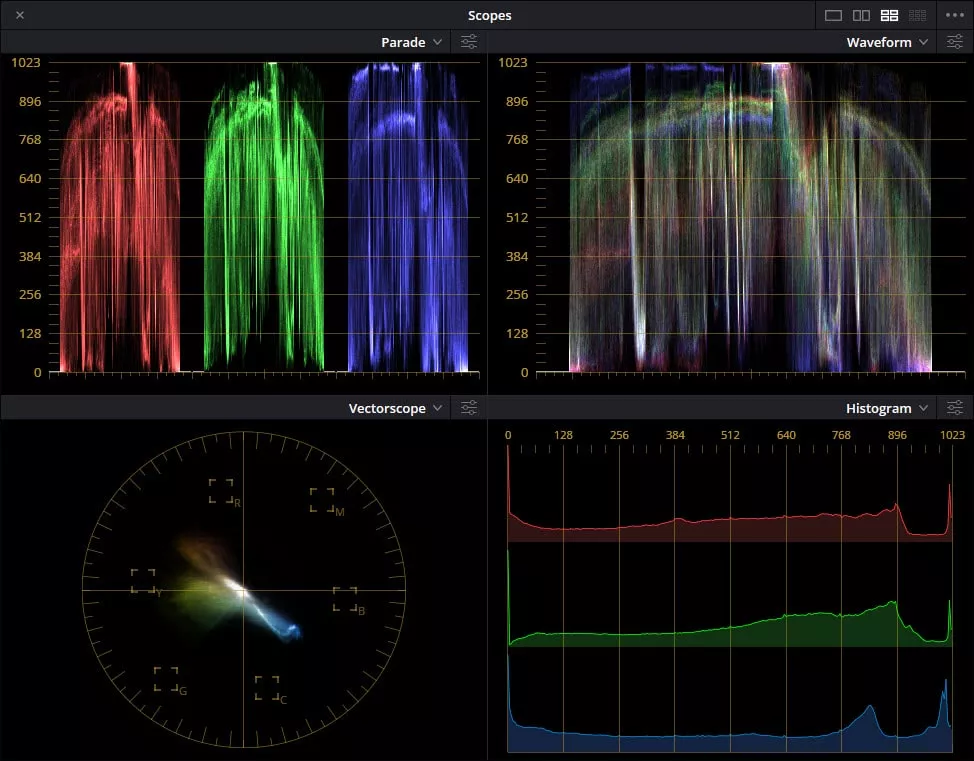
The Waveform monitor displays the luminance levels of a video signal and is used to adjust exposure and contrast.
It plots the brightness values from left to right, corresponding to the image’s horizontal axis with shadows (darker area of the image) at the bottom and highlights (brighter areas of the image) at the top.
The Vectorscope shows the chrominance (color) information in a circular graph indicating how saturated the colors are and their hue according to the color wheel.
It’s particularly useful for skin tone adjustments and color balance.
The RGB Parade is a tripartite graph displaying the red, green and blue channels of the video signal.
It is instrumental in correcting color casts and ensuring that the white and black points are balanced across all color channels.
The Importance of a Calibrated Monitor and Environment
Color correction should be performed in a controlled environment to ensure that the colors you see on the screen are accurate.
A calibrated monitor is crucial because it ensures that your display conforms to industry standards for color and luminance.
Without calibration the colors on your monitor may not accurately represent the video signal leading to incorrect color adjustments.
The environment in which you perform color correction also plays a significant role.
Ideally the room should have neutral-colored walls (usually gray) to prevent color casts and the ambient lighting should be consistent and not too bright.
These conditions help maintain color perception consistency and reduce eye strain.
Setting Up Your Workspace for Color Correction
Customizing the Layout for Color Correction Tasks
Before diving into the color correction process it’s crucial to set up an efficient workspace that caters to your needs.
In most software you can customize the layout by adjusting panels and scopes to create an environment conducive to color work.
For example you might want to add a reference monitor next to the source monitor for shot matching and expand the timeline to cover less relevant panels like audio levels.
It’s also helpful to have any other panels readily accessible displaying tools like the Vectorscope, YUV, Parade (RGB), and Waveform (Luma).
These scopes are indispensable for accurately assessing color and exposure.
Choosing and Understanding the Right Color Space
Color space selection is a fundamental step in setting up your workspace.
The color space determines how color hues are represented in your video.
Common color spaces include Rec. 601 for standard definition, Rec. 709 for high definition and Rec. 2020 for HDR and 4K footage.
Your choice should align with your project’s delivery format.
For instance, if you’re working with HD footage Rec. 709 is the appropriate color space.
This setting ensures that the colors you see and adjust in your workspace will translate correctly to the intended output.
Utilizing Reference Monitors for Consistency
Consistency is key in color correction and using a reference monitor can significantly enhance the accuracy of your color work.
A reference monitor is a calibrated display that provides a true representation of your colors and luminance levels.
It’s essential to use a reference monitor to ensure that the corrections and grades you apply in your workspace match the final output.
This is especially important in environments where lighting and room color can affect the perception of color on your main editing monitor.
By setting up your workspace with these considerations in mind you can create a solid foundation for the color correction process.
A well-organized layout, the correct color space and a reliable reference monitor are all critical components that contribute to a successful color correction workflow.
The Color Correction Workflow
Selecting a Hero Shot for Reference
One of the first steps in the color correction process is to select a “hero shot” that will serve as a reference for the rest of your footage.
This shot should be representative of the majority of your footage in terms of color and exposure.
It’s important to choose a shot that is not an outlier as it will be used to ensure consistency across all clips.
Once you’ve selected your hero shot you can begin making adjustments to it and then use it as a benchmark to match other shots in your sequence.
The Role of Input LUTs
Look-Up Tables (LUTs) can be a powerful tool in the color correction workflow.
Input LUTs specifically can be used to quickly bring your footage to a baseline look by compensating for the color profile of the camera used to shoot your footage.
For instance if you’ve shot your footage in a flat or log profile applying the appropriate input LUT can instantly give you a more natural starting point for further color correction.
This step can crucial for saving time and ensuring that the subsequent adjustments you make are on a consistent, neutral base.
However do not mistake this action of using LUTs for color correction with using lUTs to achieve an overall color grade.
Color grading is a separate process done after color correction.
Step-by-Step Guide to Basic Video Color Correction
- Adjust White Balance: Start by correcting any color temperature issues using the white balance selector or temperature and tint sliders.This ensures that whites in your footage appear natural.
- Set Exposure: Use the waveform scope to adjust the overall brightness of your shot, making sure that your highlights and shadows fall within the appropriate range.
- Tweak Contrast: Modify the contrast to add depth to your image, being careful not to crush your blacks or blow out your whites.
- Balance Tones: Adjust the blacks, shadows, highlights, and whites sliders to fine-tune the tonal range of your image. This step is about balancing the darkest and brightest areas of your footage.
- Control Saturation: Finally, adjust the saturation to achieve a natural look. Be cautious not to oversaturate skin tones or other important elements in the shot.
Throughout this process it’s essential to continuously refer back to your scopes to ensure accuracy as well as your hero shot to maintain consistency.
Remember, the goal of basic video color correction is to achieve a balanced, natural-looking image that matches across all shots.
Advanced Techniques in Color Correction
White Balance Correction
White balance is a pivotal aspect of color correction as it ensures that the colors in your video are as accurate and natural-looking as possible.
All software with decent color correction tools will offer some kind of white balance selection tool and is a quick way to correct white balance issues.
By selecting a reference point in your footage that should be white or neutral grey the tool automatically adjusts the color temperature and tint.
This can be a white card, a grey card or any neutral element within the scene.
However, the automatic adjustment may not always be perfect and fine-tuning may be necessary to achieve the desired look.
Fine-Tuning with Temperature and Tint Sliders
After using a white balance tool or if you prefer manual control, the temperature and tint sliders are your next tools for fine-tuning.
The temperature slider adjusts the coolness or warmth of the image while the tint slider compensates for green or magenta shifts.
A balanced image should not lean too heavily towards any color and the RGB Parade scope can be an invaluable reference for ensuring each color channel aligns properly.
Remember, subtle adjustments can make a significant difference so move the sliders incrementally and observe the changes carefully.
Balancing Tones: Blacks, Shadows, Highlights, and Whites
Balancing tones involves adjusting the darkest and brightest areas of your image to create depth and detail.
The blacks and whites adjustments set the points for pure black and pure white respectively while the shadows and highlights sliders adjust the intensity of the dark and light areas without affecting the absolute black and white points.
Use a Waveform (Luma) scope to ensure that your blacks and whites fall within the appropriate range typically avoiding clipping at the 0 IRE and 100 IRE marks.
This step is crucial for maintaining detail in your footage and avoiding a washed-out or overly contrasted look.
Adjusting Saturation for a Natural Look
The final touch in the basic color correction process is adjusting saturation.
Saturation refers to the intensity of the colors in your image.
Too little saturation can make your footage look lifeless while too much can make it look garish and unnatural.
The goal is to achieve a natural, pleasing color intensity that reflects the mood of the scene without distracting the viewer.
Use the saturation slider to fine-tune the color intensity and refer to your scopes to ensure that colors are represented accurately and consistently throughout your footage.
Advanced color correction techniques involve a combination of automated tools and manual adjustments.
Using Masks and Tracking for Precise Corrections
Isolating Areas with Masks for Targeted Corrections
One of the most powerful tools in a colorist’s arsenal is the ability to isolate specific areas of a frame for targeted color correction.
This is achieved through the use of masks.
Masks can be created in various shapes such as rectangles, circles or freeform shapes to define the area of the image that requires correction.
By isolating these areas colorists can make precise adjustments without affecting the rest of the image.
For instance if an object in the scene needs to be brighter or have its color changed, a mask can be drawn around it and the necessary corrections can be applied to just that object.
Motion Tracking for Consistent Color Adjustments
Obviously when working in video objects or subjects will move within a scene as opposed to still images.
Keeping color adjustments consistent within this scenario becomes a challenge and this is where motion tracking comes into play.
Modern color correction software or color correction modules within editing software allow colorists to track the movement of objects within a frame.
By attaching a mask to a tracking point on the moving object any color adjustments applied to the mask will follow the object as it moves.
This ensures that the color correction remains consistent throughout the shot providing a seamless viewing experience.
Correcting Skin Tones and Exposure with Reference Charts
Correcting skin tones and exposure is critical for maintaining a natural and professional look in video production.
Colorists often use reference charts such as the X-Rite Color Checker during filming to aid in post-production color correction.
These charts provide a standard reference for color and luminance levels.
By using masks to isolate skin tones or exposure areas and comparing them to the reference values on the chart, colorists can achieve accurate and consistent corrections across different shots and scenes.
Moving Beyond Basics: Secondary Color Correction
Exploring Secondary Color Correction Tools
Secondary color correction is an advanced technique that allows you to isolate and adjust specific colors or areas within your image without affecting the rest of the frame.
This is particularly useful when you need to correct problematic areas or enhance certain elements such as skin tones, skies or specific objects.
Tools for secondary color correction often include HSL qualifiers, color masks and tracking features that enable precise control over the selected areas.
Curves, Color Wheels and HSL Secondary: When to Use Them
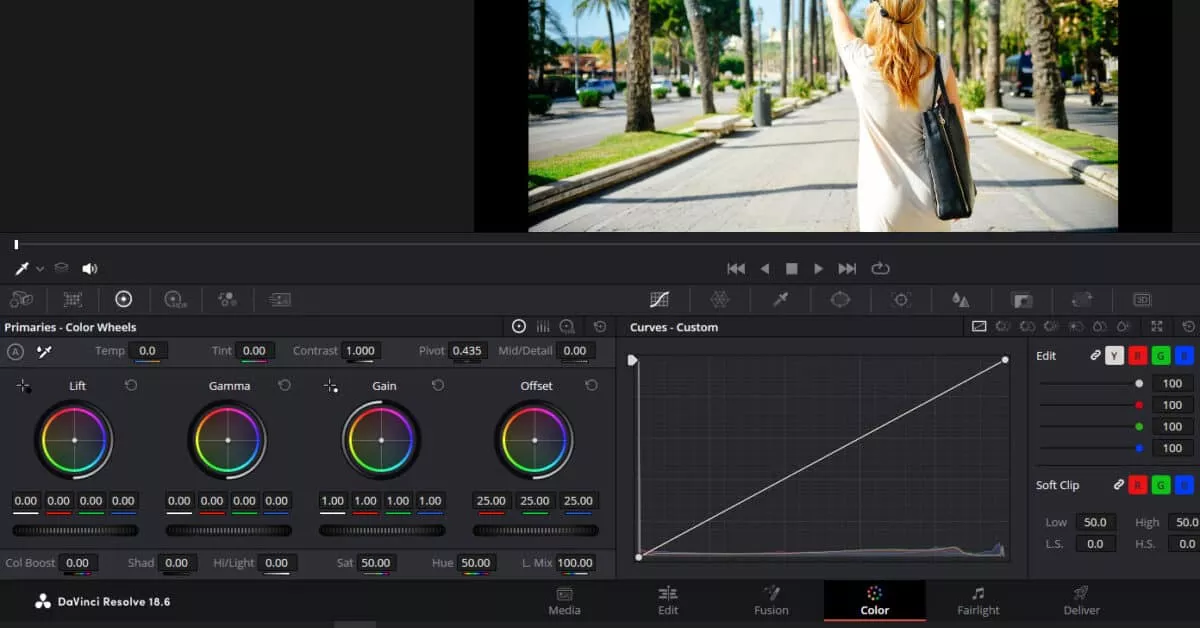
Curves are versatile tools that can adjust the luminance and color channels of an image.
They are ideal for making fine-tuned adjustments to contrast and color balance.
Color Wheels are divided into shadows, midtones and highlights allowing you to color correct specific tonal ranges independently.
They are great for achieving a balanced look across different brightness levels.
HSL Secondary controls let you isolate a color range using hue, saturation and luminance parameters then apply targeted corrections.
This is particularly useful for fixing skin tones or enhancing specific colors that need to stand out.
Practical Tips for Secondary Color Correction
- Always start with primary color correction to balance the overall image before moving on to secondary corrections.
- Use the Vectorscope to ensure skin tones fall along the skin tone line for natural-looking results.
- When using HSL qualifiers be sure to feather the selection to avoid harsh edges and create a seamless blend.
- Employ masks and tracking to maintain consistency in color adjustments, especially when dealing with moving subjects.
- Adjust the saturation and lightness of your selected color range to make it pop or blend in as needed.
- Remember to toggle the visibility of your secondary corrections to compare the before and after effect and ensure a natural look.
Secondary color correction is a powerful tool in your post-production arsenal. By mastering these techniques, you can take your color work to the next level, ensuring your footage not only looks balanced but also visually compelling.
Leave a Reply