When you are shooting video, how you compose your shots can make the difference between an amateur looking effort and a professional looking one.
Whether you’re using a smartphone, a DSLR or a professional video camera the basics of shot composition are pretty much universal.
Here are some essentials to help you elevate the quality of your videos.
What is Shot Composition?
Shot composition refers to how elements are arranged within the frame you’re shooting.
It impacts the viewer’s attention, the flow of the story and the overall aesthetic of the video.
Simply put it is one part of a number of things with regards to video that either holds audience attention or fails to hold attention.
Good composition keeps your audience engaged and helps communicate your narrative more effectively.
Rule of Thirds

The Rule of Thirds is a foundational principle in both photography and videography and in itself comes from the way humans tend to view images.
It is the same whether it is a single image such as you would find in photography or a painting or a series of images as you would see in a video.
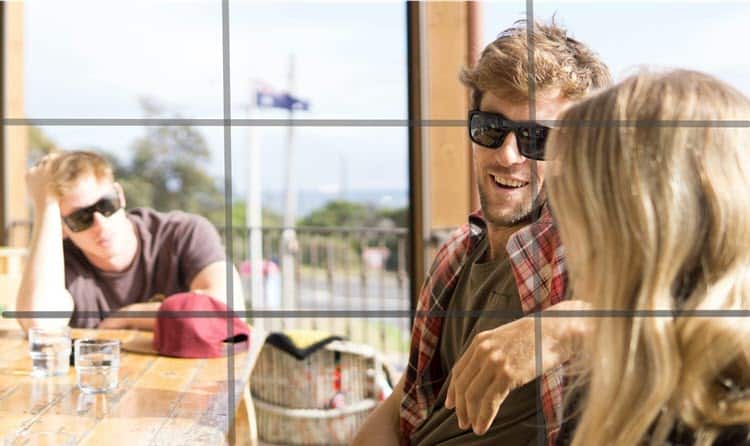
The idea is to divide your frame into nine equal parts by drawing two equally spaced horizontal lines and two equally spaced vertical lines.
Placing important elements along these lines or at their intersections typically results in a more balanced and engaging composition.
The tendency of an amateur videographer is to try to center the subject of the video in the frame in an effort to make sure it is included and noticable.
On the surface this may seem to make sense but from a viewer perspective it comes across as dull and unimaginative.
Centering the subject can be used to create an effect and you only have to look at a Wes Anderson film to see that effect expertly used.
Just remember to treat it as an effect and not your stock in trade.
How to Apply:
- Turn on the grid option in your camera settings if available.
- Position key elements like subjects, horizons or points of interest along the lines or their intersections.
- Use centered subjects sparingly as a counterpoint to shots using the Rule Of Thirds.
Leading Lines

Leading lines are (usually) naturally occurring lines that guide the viewer’s eye through or across the frame often “leading” them to the main subject.
These lines can be anything from roads, fences, rivers, cloud formations or even the way light falls on your scene.
How to Apply:
- Before shooting identify any natural or man-made lines in your environment that may be of use.
- Position your camera or subject in such a way as to have those lines lead towards the subject you want to emphasize.
Framing

Framing involves using elements within your scene to create a “frame” around your subject inside the actual frame of the overall shot.
This could be the wall joins of a room, a window, plants, trees or just about anything.
This can focus attention and add depth to your composition.
How to Apply:
- Look for natural frames like windows, doorways, arches or tree branches.
- Position your subject within this secondary frame to draw attention and add context.
Depth

A flat-looking video very often by that flat nature will be visually uninteresting due to the almost two dimensional nature it presents.
By adding depth, you create a more immersive experience for your viewers by creating a sesne of the subject being “in” a space with the audience sharing that sense of inclusion in that space.
Depth can be achieved through the use of foreground, middle ground, and background elements.
By that we mean positioning things in the frame that occupy the foreground, the middle ground and the background and thus creating a sense of depth.
How to Apply:
- Experiment by placing objects of interest at different distances from the camera and observe the results.
- Use techniques like layering, where you place a piece of foreground (e.g., plants) very close to the camera, while your subject remains in the middle distance, with the background elements in the far distance.
Perspective

Changing your camera’s angle or position can drastically affect the narrative and emotional impact of your shot.
High angles can make a subject seem small or vulnerable, while low angles can make them appear more imposing or significant.
Remember that the viewer is actually looking at the unfolding seen thruogh the camera so in that sesne the camera is the viewer’s persective.
How to Apply:
- Experiment with different angles: eye level, high angle, low angle, and even tilted or “Dutch” angles.
- Consider what you want to convey about your subject or scene and choose your angle accordingly.
Symmetry and Patterns

Human eyes are naturally attracted to symmetry and patterns.
These elements can be used to create visually appealing shots or draw focus to specific areas within your frame.
How to Apply:
- Symmetry works well in shots where balance is important, such as interviews or architectural footage.
- Identify repeating patterns, like rows of windows or columns, and use them to create an interesting visual flow.
Background and Foreground
Balancing the background and foreground elements can enhance your shot dramatically.
An overly busy background can distract from the main subject while a bland background might make the shot look flat.
Include the concept of Depth of Field as previously discussed as a way to include or exclude the importance of the background.
How to Apply:
- Scout for backgrounds that complement but don’t overpower your subject.
- Use a shallow depth of field (a technique where only your subject is in focus, and the background is blurred) to make the subject stand out.
Camera Movement
Movements within your shot can add dynamism and keep your audience engaged, but they have to be well-planned to be effective.
Random movement within a shot can be distracting if there appears to be no real reason for that movement.
If you have movement of the subject in the shot then you add camera movement on top of that things can get out of hand rather quickly!
How to Apply:
- Incorporate subtle camera movements like pans or tilts for a dramatic effect but always balance it against the movement of the subject within the shot.
- Start with a basic rule that if the camera is moving then the subject should not move a lot or if the subject is moving then the camera should not.
- Ensure that any movement serves a purpose, be it to follow a subject, reveal important details, or transition between scenes.
Practical Tips
- Steady Your Shots – Use a tripod or stabilizer to avoid shaky footage.
- Mind the Headroom – Ensure there’s adequate space between the top of your subject’s head and the top of the frame.
- Check the Lighting – Good lighting is crucial. Natural light often works best for beginners.
- Review and Adjust – Always review your footage and adjust your composition as needed.
Experiment
The rules of videography are not actually set in stone and serve more as guidelines more than anything else but if you follow the rules you will get “good” results.
Great results come from learning the rules, following them until you understand them and what they are doing fully and only then experimenting with breaking the rules to see what happens.
Composition isn’t just about making beautiful images, it’s about making effective images that serve your story and engage your audience.
Discover more from The DIY Video Editor
Subscribe to get the latest posts sent to your email.
Leave a Reply