Shoot Great Video with Any Camera
A few years back the guys at DigitalRev TV on YouTube were continuing their series on getting pro photographers to create images using nasty cheap cameras.
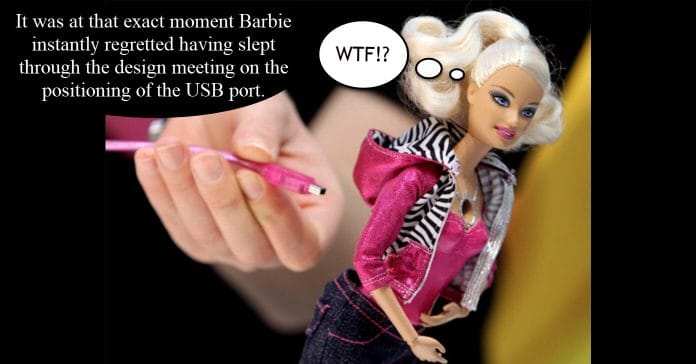
In one episode they talked Phillip Bloom a well known cinematographer, to create a video also using a cheap and nasty video camera.
He agreed to the challenge without actually establishing what the camera choice would be… foolish!
So they armed him with a “Barbie Cam” and sent him on his way!
Just in case you have no idea what a Barbie Cam is, it was a toy product from the “Barbie” range that had a tiny lens mounted in Barbie’s cleavage connected to a totally crappy camera.
You can see the results for yourself below.
Now the reason I thought of this was because this week another team of video creators on YouTube attempted to do something similar.
The difference with this one being that as they were using the cam (cheap and nasty but not quite Barbie cheap and nasty) and working their way through the process they explained what they were doing and why they were doing it.
Philip Bloom, Barbie Camera Challenge
25 VOICE OVER TIPS Explained with Examples
This is a great tutorial on the subject of voice over work just jam packed with goodies that almost anyone can apply to their own video projects.
One common point upon which many home style movies or videos fall down upon is the audio.
I have posted many times on this subject and it is one of the basic rules of video editing.
If your audio is not up to scratch the quality of the video and your editing begins to become irrelevant as the audience will be drawn away from the subject by the presence of bad audio.
Now although bad audio in terms of pure sound quality is what most people think of when looking at this subject there is another aspect to it which leads me to the reason why I have added this tutorial.
The average amateur home movie editing sequence generally speaking, goes something like this.
A bunch of footage is taken during a holiday, party or some kind of event.
Usually due to a range of technical limitations, the audio from most of that footage is pretty much unusable.
Either the quality is poor, there is wind noise or too much background noise or whatever.
The amateur editor then adds all of the footage to the timeline of the editor basically in the sequence it was shot then begins cutting out unusable sections until all the footage on the timeline is at least presentable.
Then some random transitions are added to break things up, titles at the beginning and end credits at the end and we are almost done!
Finally the problem of the audio becomes the only thing left and usually at this point the options are either go with the existing terrible audio or add some generic music.
More often than not the generic music is the easiest way forward and voila! We are done!
For many of these types of projects there is one basic alternative to just slapping in some music and that is to do a voice over track at least for parts of the video.
It usually takes one or two attempts by most users on this point to give up and very quickly go back to the music option! Why?
Because doing voice overs has it’s own set of rules and procedures that you need to know before you can get a result that isn’t atrocious.
The reality they are not too hard to master and even of you only apply a few of them you too can create a voice over track for at least some parts of you projects to give them a little audio lift towards a more enjoyable video.
Cheap Mic/Good Placement vs. Pro Mic/Bad Placement
A few weeks back I ran a few articles on the subject of choosing microphones.
You can check back for those articles HERE and HERE.
Both of those articles give you all you need to know about what the different types of microphone are, which are the best ones and most importantly, which ones are the best for various types of shooting situations.
However none of those articles actually go into the use of the microphone in any kind of real world setting.
The video below goes into some great detail on the actual use of microphones under various circumstances and shows how to get the best performance from whatever microphone you have.
6 IN-CAMERA Video Transitions in 120 Seconds
Just an excellent video below on creating in-camera transitions for any montage style video.
If you check it out you will see just how easy it is to use these types of transitions in a video sequence and all it take really is a little planning.
Intermediate Video Editing Formats
Last week I added a link to a tutorial on using the Cineform codec in Vegas software for the purposes of editing.
Just to recap a little, the main codec that most people will be using to shoot video will be the H.264 codec.
Now you may end up with MP4 files or .mov files or whatever but lying underneath that “wrapper” extension on your files will be video data captured and compressed using the H.264 codec.
The problem with that codec is that although when you look at the footage it all seems pretty awesome, when it comes to editing things start to go a bit off track pretty fast.
There are two main reasons for that.
First, the codec itself was developed for playback ONLY so at no time was there any consideration given to its design from the point of view of editing.
Because of number one above we get the second problem which is that when it does playback it uses huge computer resources to decompress the video so you can see the nice pictures on your screen.
When you are trying to edit those files or especially if you are adding effects or complicated processes, your computer is now not just decompressing for playback.
It is decompressing, adding whatever you added, calculating changes and a whole bunch of stuff that really stresses things out.
So that’s the reason in the Vegas brands of software you can convert those files to the Cineform codec as an “intermediate” format.
It is FAR more amenable to the whole editing process especially for intensive post production techniques like color grading and special effects.
If the Cineform option is not available to you an alternative is to use a free file conversion program like Handbrake.
Using Handbrake you can at least re-encode those H.264 files to a less compressed H.264 profile which can take a lot of the load off your computer.
If you really want to go with Cineform but your editor is not compatible with it another alternative is the venerable and still free VirtualDub which is now called VitualDub 2.
You can just load your footage into it, choose to “Save as” then set the codec at “Cineform by GoPro” and choose .avi as the file extension.
VirtualDub 2 will automatically detect most of the technical stuff for you so all you have to do generally is to choose the highest quality and you will be good to go.
Most modern video editors will be able to handle that with ease.
Now a word of warning here.
Uncompressed or at least “less compressed” files are really big so make sure you have acres of space on your hard drive to deal with this.
As a test I converted a 40Mb MP4 created using the H.264 codec into a .avi file using the Cineform codec at maximum quality and the resulting file was 2.75Gb!
Using the J and L Cuts – Video Editing Tutorials
This is a short, sweet and totally to the point video on creating and using J-cuts and L-cuts.
I have included lots of videos over the years on this vital editing technique but the one below is not just a great explanation of the process but an easy to follow demonstration.
One of the biggest hidden secrets to professional video editing is the use of these types of cuts in any project.
They remain largely “secret” because just by watching a video you would never notice exactly what is happening and is another example of the power that audio wields in any video production.
CyberLink PowerDirector 16 – News Ticker Tutorial
In the video below Maliek from PowerDirector University goes through in great detail how to create a news ticker style lower third.
For me the one thing it illustrates is just how far consumer level video editors have come over the past ten years or so.
These days there really is not that much they can’t do when compared to the fully professional programs.
The other thing it points out is that no matter what editing software you are using, when it comes down to creating professional looking videos and intricate little effects, editing is still a fiddly and time consuming activity!
How to COLOR GRADE like GIBSON HAZARD
Gibson Hazard is a professional video maker who at the moment is a bit “flavor of the month” due to his heavily stylized videos clips mainly in the area of music videos.
He tends to specialize in live music events whether they be live concerts or live in the studio.
One of the restrictions within this type of environment is that he as a filmmaker tends to have little or no control over the lighting and setup of his shoots.
One of the main reasons he is successful is that he takes this lack of control and turns it to his advantage by the use of extreme color grading and an editing style that works with those restrictions rather than against them.
The video below covers a few pointers on just how he achieves those effects at the color correction/grading stage of the editing process.
Filmora.io Launched
The guys at WonderShare who make the Filmora program have just launched a new website aimed at the budding video blogger (vlogger) with all sorts of resources and assets on offer for free.
You don’t have to actually be a Filmora user to access the site and although the stated audience is video bloggers, there are some great resources for video makers of all shapes and forms.
Video Lighting – How to Fake Sunlight Indoors
This is just a simple lighting tutorial I though I would add this week and to be honest all you really need is a white sheet.
The guys in the demo use some pretty strong studio type lights to get the look they are demonstrating but in all reality some cheap work lights would do exactly the same thing.
Leave a Reply