The gap between an amateur looking YouTube video and a professional one isn’t usually about expensive gear or advanced techniques.
It’s about a handful of decisions, made consistently, that add up to something that feels polished and very one of those decisions is learnable.
Filming Techniques for Professional-Quality Videos
Before you touch a single edit, you need good footage to work with and whilst editing can fix a lot, there are limitations, so let’s start where the video actually begins: in front of the camera.
Lighting Importance
Lighting is one of those things viewers never consciously notice when it’s done well, but they absolutely notice when it’s done poorly.
Muddy, uneven, or oddly colored footage is one of the fastest ways to make a video feel unprofessional, even if everything else is great.
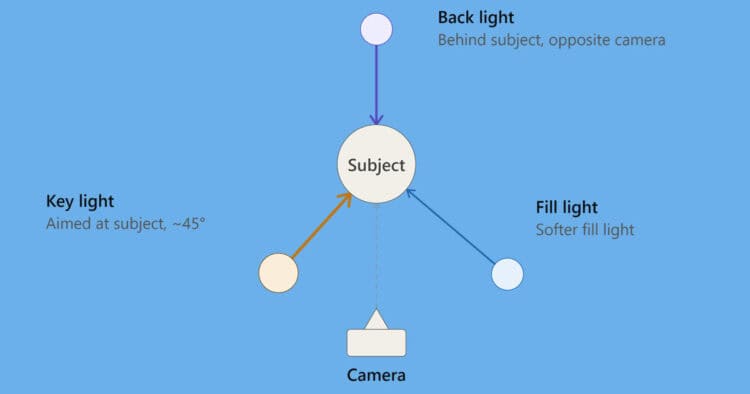
The classic approach is called three-point lighting and it’s simpler than it sounds.
You’ve got your key light, which is your main source and sits slightly off to one side of your face.
Then there’s your fill light, a softer light on the opposite side that fills in the shadows the key light creates.
Finally, your backlight sits behind you, separating you from the background so you don’t blend into it.
You don’t need a professional studio to pull this off, a couple of affordable ring lights or softboxes from an online retailer will get you most of the way there.
If you’re working with a tighter budget, natural window light is genuinely one of the best resources available to you and it’s free.
Just face the window or position yourself with it slightly to the side rather than sitting with your back to it and you’ll get soft, flattering light for nothing.
One thing worth watching for is color temperature.
This is just a fancy way of describing whether light looks warm (yellowish, like a lamp) or cool (bluish, like daylight or many overhead LEDs).
When you mix the two in the same shot, skin tones can start to look a little off, sometimes greenish, sometimes just not natural.
You can easily dig into the more advanced settings of your phone or whatever device you are using to shoot your video with and find the White Balance controls to set it manually.
There is no need to go all technical or too deeply into it, just adjust the white balance until what you see on the screen more accurately reflects the scene you are shooting.
Try to keep your light sources consistent so you’re filming near a window, maybe turn off that warm desk lamp for now.
If you can get it reasonably close when you are shooting, you can easily adjust it once the footage is in your video editing app.
Audio Importance
This is a point that catches a lot of new creators off guard: audio quality matters more than video quality.
Viewers will forgive a slightly soft picture far more readily than they’ll forgive audio that crackles, echoes or is hard to understand.
Bad audio makes people almost instinctively click away and most of the time they don’t really know what it is that made them do it!
There’s a simple bit of physics behind why microphone placement matters so much and you don’t need to be an a rocket scientist (or brain surgeon) to use it.
It’s called the inverse-square law and the practical takeaway is this: sound quality drops off dramatically the farther your microphone is from the sound source.
In plain terms, a budget lavalier or shotgun mic sitting close to your mouth will almost always sound better than an expensive microphone placed across the room.
Distance is the enemy here, not your gear budget.
And while we are at it, please, disable or ignore your camera’s built-in microphone.
It’s designed to pick up everything in the room, which is exactly what you don’t want.
Camera Positioning
Framing matters more than people realize.
The Rule of Thirds is a great starting point, imagine your frame divided into a tic-tac-toe grid and try to position yourself along those lines rather than dead center, it creates a more balanced, intentional-looking shot.
Camera height matters just as much.
Keep your camera at eye level.
Shooting from below tends to look unflattering and can even feel a little unsettling to viewers, while eye-level framing creates a sense of connection, almost like you’re having a real conversation.
If you’ve ever watched a video where the creator’s laptop camera was propped low on a desk, you know exactly the angle to avoid.
Shooting from slightly above causes you to lose credibility as it has an unconscious effect of diminishing you as a credible source.
Stabilization
Shaky footage is distracting, full stop
For static setups, think talking-head videos or product reviews, a basic tripod, a gorilla pod wrapped around a railing, or even just a stack of books on a flat surface will do the job.
If you’re moving around while filming, try what’s often called the “ninja walk”: bend your knees slightly and take smooth, deliberate steps, almost like you’re trying not to spill a full cup of coffee.
Combine that with bracing your arms against your body, and your handheld footage will look far steadier than you’d expect.
Environment Prep
Before you hit record, take thirty seconds to actually look at your space.
Is there clutter in the background pulling focus away from you?
Can you hear the air conditioner, a fan, or the refrigerator humming in the next room?
These things are easy to miss when you’re focused on what you’re about to say, but they’re often the first things a viewer notices.
A quick scan and a few small adjustments now will save you a lot of frustration in editing later.
Editing for Maximum Impact
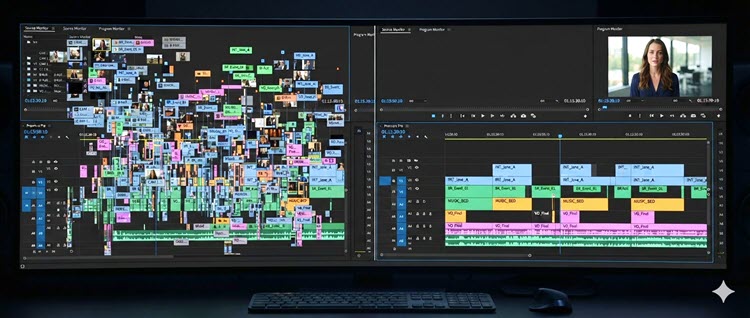
Once you’ve got solid footage and clean audio, editing is where the video really comes together.
This is also where a lot of beginners either overdo it or feel overwhelmed by their software so let’s simplify it.
Key Editing Software Options
You don’t need professional-grade software to make professional-looking videos.
Tools like CapCut, Filmora, and CyberLink PowerDirector are genuinely excellent starting points as they’re approachable for beginners but have enough depth that you won’t outgrow them the moment you get comfortable.
Pick one, learn its basics well and resist the urge to chase every new app that promises to be easier.
You can click here to see my recommendations for the Best Easy to Use Video Editing Software for new creators.
Transitions and Effects (Calm Down!)
Restraint is what separates polished editing from amateurish editing.
It’s tempting to use every flashy transition your software offers, but more often than not, that initial excitement works against you.
Instead, aim for what editors call “invisible transitions.”
A J-cut is when the audio from your next scene starts playing just before the video actually cuts to it, you hear the next moment begin before you see it.
An L-cut works the other way: the video cuts to the next scene, but the audio from the previous one lingers for a beat.
Used well, these make talking-head videos feel like natural conversation rather than a series of disconnected clips because they’re subtle, and that’s exactly the point.
The most commonly used transition at the pro level is actually no transition at all, it’s just a straight cut.
Pacing and Time
This next technique alone can transform how professional your videos feel: the jump cut.
Every time you say “um,” pause too long or trail off mid-thought, a quick jump cut removes that dead space and tightens up your delivery.
Done well, it makes you sound more confident and articulate than you might feel in the moment and honestly, most successful YouTubers rely on this far more than viewers realize.
Bear in mind that in years gone by the jump cut was considered to be a mistake and a technique only to be used when an intentional “jump” in time was the desired outcome.
However, since the introduction of shorter, social media specific content, this has become a technique so common that viewers are completely accustomed to it and rarely even notice it.
Keyboard Shortcuts
If you learn nothing else about your editing software, learn its keyboard shortcuts for Split, Ripple Delete and Play/Pause.
That’s it, just three or four.
It sounds small, but reaching for a mouse every time you need to trim a clip adds up to hours of wasted time over the course of a video.
Learn these early, and your editing speed will roughly double in the long run.
Engagement Strategies to Retain Viewers
You can have beautifully shot, expertly edited footage and still lose your audience if you don’t think about how they experience the video.
This part is less about technical skill and more about understanding how people actually watch.
Underlying this is a concept and skill every creator need to understand and implement exactly.
Whatever you think about your content, your thumbnails, your titles and anything else about your videos sits secondary to what you potential audience thinks about it.
Get over yourself and start creating for your audience!
Compelling Thumbnail Images and Titles
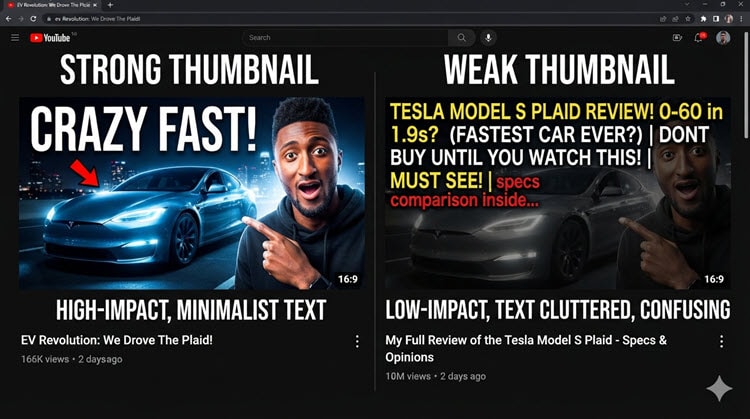
Think of your thumbnail as a billboard, not a book cover.
Viewers are scrolling quickly, often on a small phone screen, so your thumbnail needs to communicate instantly and this is where the Three-Second Rule comes into play.
By actually testing you have about three seconds (it may actually be less) to grab the attention of a viewer and get the click through to your video.
Use high-contrast backgrounds, expressive faces (humans love to see faces) and keep any text to under four words.
Whatever you do, don’t just repeat your video title on the thumbnail as you want them to work together, not duplicate each other.
The Role of Storytelling
Every good video follows some version of the Hook-Body-Payoff framework.
The hook is your first 5 to 15 seconds and its only job is to confirm that this video delivers on what the title and thumbnail promised, while giving the viewer a reason to keep watching.
Skip this step and even great content behind it won’t get seen.
Viewer Interaction & Calls to Action (CTAs)
Here’s a small shift that makes a real difference: don’t save your call to action for the very end.
By the time most videos wrap up, retention has already dropped significantly so plenty of viewers simply aren’t there anymore.
Similarly don’t place CTA’s too near the beginning of the video before you have delivered any real value to the viewer.
Doing that drops your credibility given that you are asking for something before having provided something of value.
Instead, place your main CTA right after you deliver a genuinely valuable point somewhere in the middle.
That’s when your audience is most engaged and most likely to actually act on it.
Pattern Interrupts
Our brains are wired to notice change and tune out sameness or repetition.
Repetition can come in many forms such as cutting to the beat of the background music every time, staying with a fixed head shot without change, using the same transition over and over or endlessly having titles appear without breaks when there are no titles.
Every 10 to 15 seconds at least, give your viewer’s brain something new to latch onto like a bit of b-roll, a text overlay, a well-placed sound effect or a subtle zoom.
You’re not trying to be flashy here, you’re simply keeping attention active instead of letting it drift.
Common Mistakes to Avoid
Here are a few things worth watching for, because knowing what to avoid is often just as valuable as knowing what to do.
Shooting and Editing Pitfalls
Over-editing is a common trap: piling on flashy 3D transitions, applying conflicting color filters or letting background music drown out your voice.
When in doubt, pull back because simpler almost always looks more professional than more.
Audience Engagement & Retention Mistakes
Watch out for what’s sometimes called “The Me Syndrome” which is spending the first minute or two talking about channel updates, your logo or a lengthy personal introduction before getting to the actual content.
Viewers came for the value you promised them so give it to them quickly and earn the right to talk about yourself later.
Learning From Feedback
Your YouTube Studio Audience Retention graph is one of the most useful tools you have, so use it.
Look at it objectively, almost like a scientist reviewing data rather than a creator reading criticism.
Notice exactly where viewers tend to drop off and ask yourself why.
Was the intro too slow? Did the pacing lag in the middle?
Treating this data as a diagnostic tool rather than a personal judgment will help you improve faster than almost anything else.
Export Settings Confusion
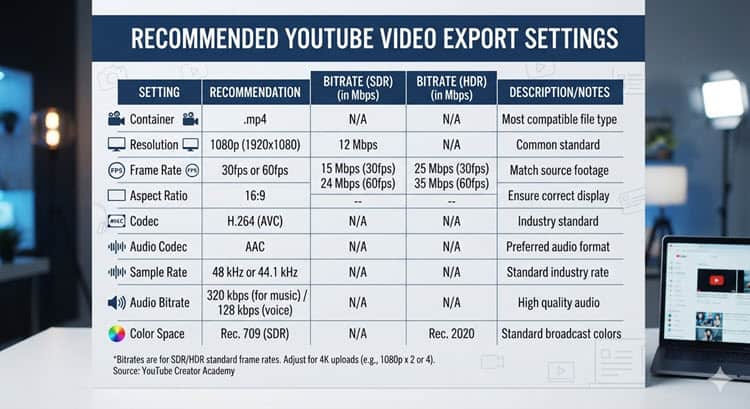
Finally, let’s talk about a step that trips up a lot of beginners: exporting.
YouTube re-compresses every video you upload regardless of how you rendered it in your software.
If your export settings aren’t dialed in correctly, that compression can make your video look noticeably worse than what you edited.
The fix isn’t complicated, it mostly comes down to choosing the right resolution, frame rate and bitrate before you hit upload, so YouTube’s compression has good-quality footage to work with rather than something already stretched too thin.
Get this step right, and you’ll protect all the hard work you put into everything before it.
As a reference here is a more detailed article on exactly how to render your videos prior to uploading: Why Do My Videos Look Bad After Uploading.
None of this requires you to become a technical expert overnight.
Start with one or two of these ideas, maybe better audio placement and a cleaner hook and build from there.
Professional-looking videos are less about mastering every tool and more about making thoughtful choices, consistently.
Key Takeaways
- Good lighting, audio quality, and camera positioning are crucial for creating professional-quality YouTube videos.
- Use three-point lighting, avoid bad microphone placements, and keep the camera at eye level.
- Editing should focus on pacing and simplicity; use jump cuts and avoid flashy transitions to enhance clarity.
- Engage viewers through compelling thumbnails and strategic calls to action placed mid-video.
- Learn from audience retention data and optimize export settings to maintain video quality on platforms.
Leave a Reply