How to Make Footage from Different Cameras Look the Same
Home editing has changed vastly over the past few years and one of the driving forces behind that change is the availability if footage from different sources.
It used to be that there would be “a guy” at the party or event with a camcorder and that was the footage we had!
These days nearly everyone at an event has a camera that can capture footage and are most likely using it.
This means that if the job of creating a video falls to you there is the possibility of having footage available from many sources.
There are two basic downsides to this when it comes to dealing with that footage.
The first is the problem of trying to sync everything together into a cohesive whole.
I feel pretty safe in assuming that no-one at your last record-able event was standing there with a clapper board marking the scenes for everyone!
To get all that into shape in the past meant that you had to load everything on multiple tracks on the timeline and visually get it all lined up.
Then you had to scroll through and manually cut or overlay pieces of video to effect what people call in the world of live video, switching, i.e. switching from one piece of footage to another.
The second problem with multi-sourcing video is that most often the different types of cameras or mobile devices being used results in vastly different looking video.
Different white balance and different color values.
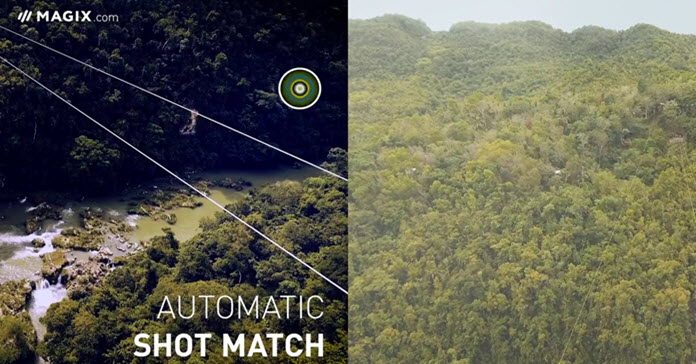
That’s why we have seen most of the major video editors introduce multi-cam editing and greater control over color matching and balancing.
However the champion of this particular set of features is still Magix.
They were the first to introduce multicam editing and their latest versions have a great feature called “Shot Match.”
That allows you to line up various shots from different sources and by simply using an eye dropper, match those shots together so they look as though they all came from the same source.
And for a more manual approach to the problem of color matching check this one out:
Free Stuff!
I came across these free video overlays and though it was worth a share.
If you do want to download them bear in mind they are 4K resolution so the zip file is about 1.1Gb in size.
On the same page if you scroll down a little further there are some other freebies as well from Rocket Stock.
Now a word of warning on using these files.
As I said they are 4K resolution but you also need to know they are MP4 files and that the frame rate being used is 23fps.
What that translates into is that if you use them in a project that is set to different resolution or frame rate you will have to adjust the overlays accordingly.
Don’t worry about the frame rate too much because your software will adjust that fairly easily.
Normally changing the frame rate with footage messes up the motion to some degree but as these are going to be used mainly as an effect it shouldn’t present too much of a problem.
6 Rules for Cinematic Editing
I am not for one second suggesting that while you are cutting together the video of your last family outing or the kid’s birthday party that you should be strictly following the rules in this video!
It does however serve the purpose of explaining very well how editing works and why certain things achieve effects you want on your audience.
There is some terrific footage of Alfred Hitchcock explaining the process very well and it is well worth a watch.
Care and Feeding of SSDs
Well I did not know that!
One of the weaker points in the overall home PC setup needed to to work with modern HD files has always been the traditional hard disc drive.
Its mechanical nature and speed limitations mean that very often (outside of a lack of RAM) it is the cause of lags or even crashes when dealing with high definition footage.
The promise of SSDs (Solid State Drives) has been around for a while now and these superior drives have been coming down in price to a point where they are becoming for more accessible.
So if you are running SSDs for any purpose at the consumer level there is one factor you need to be aware of.
These drives have been designed such that they MUST be powered up at least once per year in order to maintain the integrity of the drive and any data on it.
For most people this is not a problem if you are running a computer with an internal SSD.
Day to day use of that drive is going to keep everything in order BUT!
If you are running an external SSD that is not always connected to the computer or is not being regularly powered up you need to be aware of this factor.
They need at least an annual workout to keep themselves in top condition.
RED phone and LEIA Mobile Holographic Displays
Earlier in the year RED made an announcement that I covered here in the Friday Roundup threatening to disrupt the existing smart phone market with a new offering of their own.
The reason I covered that story was mainly due to the fact that RED threatened to do the same thing for video cameras back in the day and despite a few delays, actually managed to do just that.
The main point they were pushing with regards to the phone was the ability to display 3D footage on the phone without the use of a VR headset or anything like that.
Of course being RED they didn’t provide any example or demonstration of the proposed “holographic” display but hey, that’s nothing new for RED!
They did tease a little on the concept of the display in that it would somehow project from the phone screen but that was about all.
Recently they have let out a little more on this revealing they are partnering with a startup called Leia Inc. that makes “lightfield holographic displays ” based on a different technology than standard mobile device displays.
Theoretically their screens are capable of displaying 3D objects that appear to be coming out of the screen and by changing the view angle you can see those objects in 3D.
Earlier examples of this can be seen in the video below but it will be interesting to see how it all turns out.
In the meantime as per RED’s standard operating procedure, they have changed the proposed release time frame from early 2018 to “the first half of 2018” but you can expect that to blow out as the date approaches!
Resizing for Social Media Sites
OK so it used to be that about once every six months or so I would come across yet another article explaining the different video sizes and orientations for uploading to social media site.
In fact I can remember the glory days of only having to worry about YouTube!
These days it is a totally different story so a new article with all the relevant sizes every 3 months is not out of the question.
In the article linked below you can find the latest (for the moment) video sizes required to get the best playback from the main video sharing sites which now includes most of the main social media platforms.
How To Revitalize your Old YouTube Videos
If you have been running a YouTube Channel for any amount of time or just uploading videos you would be well aware of the fact that YouTube as a platform has undergone constant change.
This has always been done by them in the interests of improving the service but as they say, “You can’t make an omelet without breaking some eggs.”
Of course because YouTube is owned by Google it is always safe to assume that if anyone’s eggs are going to be broken it is certainly not going to be theirs!
This constant change often leaves users in the situation where many of their videos begin to lose position and views because they were set up under an old system rather than the new fangled ones!
So how does one deal with this?
Well the video below goes into some detail on this and provided solid advice on how to approach the situation.
Understand that the video itself is more directed at people who have older content that is no longer performing as well as it was.
In any case Tim’s advice on what you should touch, what you should not and more importantly WHY it is relevant to any situation.
Speed Ramping – CyberLink PowerDirector 15
In the bad old days the ability to speed up or slow down your videos in editing was considered to be rather an exotic feature!
Of course now it comes as a bog standard feature in just about all video editing software.
These days it has been enhanced to the point of being able to use key-frames to mark point at which your playback can speed up, then speed up some more or slow down.
This has resulted in a new term being used which is speed ramping. Speed ramping is a step beyond simple setting of fast or slow motion.
It is the ability to exercise full control over the speed of a clips or series of clips to great effect.
The video below shows the settings and application in PowerDirector but you can find something similar in any decent software at the Moment.
Pinnacle Studio 21 Ultimate – Wide Angle Lens Correction
Wide angle lens correction has become a pretty standard tool in the repertoire of most decent video editing software these days.
The actual reason for it started with the Go-Pro and has continued as more and more tiny mobile video cameras have appeared.
In order for these tiny devices to capture action in HD and to be able to do that under some pretty difficult circumstances they mostly come with wide angle lenses.
If they had stock standard lenses available at the sizes needed, too much emphasis would be placed on the users ability to keep things in frame.
As you are defying death riding your mountain bike down the face of a ninety degree cliff face with a camera attached to your head, the last thing you are going to be concerned with is your framing and composition!
So to increase your chances of capturing the action wide angle lenses are used.
The problem with this is that those lenses create a “fish-eye” effect in the resulting footage making it all look a bit strange.
Lens correction itself varies greatly from software to software depending on how well endowed it is.
At the base level you just have a kind of one size fits all concept where the correction applied is based on a guesstimate of the average amount of distortion the average lens would create.
In many cases this can be quite adequate if your demands are modest.
As you move up the food chain you begin to encounter modules that have specific correction for specific camera models and finally at the top, those that provide precise manual control over all the settings.
The reason I am highlighting this point is because at the moment choosing video editing software to suit your own needs is not getting much easier.
In a general sense the top brands although appearing to look different are really offering just about the same features.
The real differences are when it comes to specific features like lens correction.
So if you are likely to be using an action cam and want to be correcting that footage so that it looks right this should be a relatively import thing for you to look at.
Leave a Reply