You may have noticed how sometimes your videos look a little blue, orange or maybe a little yellow?
Most likely that’s a white balance issue and explains why getting your white balance right is crucial and not something you want to leave on auto.
What is White Balance?
Simply put, white balance is how you make the colors your camera sees match what your eyes see.
Your eyes are very good at automatically adjusting to different lighting conditions and in partnership with your brain can adjust your perception to get everything looking right.
That orange light you see in a room, well you know it’s orange and your brain compensates for that.
However your camera doesn’t have brain connected directly so it needs a little help.
White balance is the setting that tells your camera what the “correct” color temperature of the existing light is.
If it’s off, your footage can look weird – too warm (orange/yellow) or too cool (blue).
What is actually happening here is that the software (firmware actually) in the camera is identifying the lightest point in the image it is viewing.
It assumes that point is white then uses that reference as a way to identify all other differences and assign colors accordingly.
Unfortunately if that brightest point is actually a slightly blue point or a color corrected light bulb (yellowish) then all the other colors will be inaccurate to some degree.
Very often you can tell that footage has been shot using manual white balance because as the scene changes the colors begin to change as well.
For example a shot that goes from a color corrected light in a living room to a fully florescent light in another room.
The first part will be slightly yellowish and the second slightly bluish and this overall color tint is called a color cast.
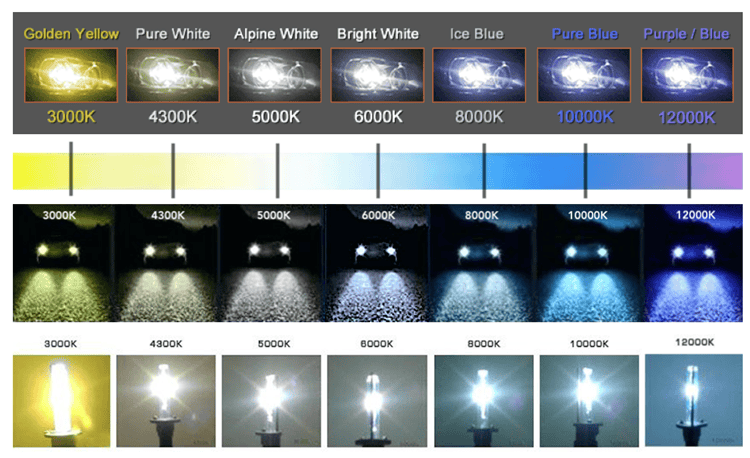
Understanding Color Temperature (Kelvin)
Physicist William Kelvin created a color temperature scale, measured in Kelvin (K), to quantify the color of white light.
The scale ranges from warm orange (around 1,000 – 3,000K) to cool blue (6,000-10,000K).
- Warm Light (1,000-3,000K): Think of a campfire’s glowing embers. Reddish-orange hues dominate.
- Cool Light (6,000-10,000K): Imagine the intensely hot flames of a fire, burning blue.
Why You Can’t Rely on Auto White Balance
As I already mentioned auto white balance can be decent in a pinch but it gets confused easily, especially with mixed lighting conditions.
So if you have a room with a warm lamp as well as daylight streaming in your camera might flip between settings mid-recording creating an inconsistent looking video.
On top of that any color correction or grading you may want to do later in video editing software will be extremely problematic because of the constant changing.
Similarly if you are using more than one camera or video recording device and have them both set to auto they will both “see” the existing light in an entirely different way.
Again, this kind of inconsistency makes post production correction a nightmare.
Manual White Balance: Taking Control
Okay, so we have established that auto can get you by in a pinch and only under very controlled circumstances but is otherwise risky.
The alternative to this is manual white balance which in a nutshell is you telling the camera what the temperature of the existing light is.
There are a few ways to approach this but just how you do it will depend on the degree of control your camera or video recording device offers.
White Balance Presets
Most cameras have a set of white balance presets for common lighting situations.
These are a great starting point:
- Incandescent (Tungsten): Around 3200K. Equivalent to normal yellowish indoor light bulbs.
- Fluorescent*: Around 3800K. Those long, tube-shaped office lights.
- Daylight: Around 5500K. Normal direct sunlight.
- Cloudy: Around 6500K. Sunlight filtered through clouds.
*In the case of Fluorescent tubes be aware that there are generally two types of these. One is often referred to as “color corrected” or similar which has a slightly more yellow appearance that the usual office type tube that is more white. Be sure to test out which preset works best.
Manual Kelvin Adjustment
If you’re feeling confident, dial in the Kelvin temperature manually.
Most cameras let you set the color temperature anywhere between 2,500 and 9,900 Kelvin.
A simple way to do this is to hold up a piece of pure white paper in front of the camera and adjust the temperature until it looks pure white.
Between the camera screen or the viewfinder you may find that you setting is a little off but generally this will get you close enough for color correction later to be very straightforward.
How to Manually White Balance
The White (or Gray) Card Method
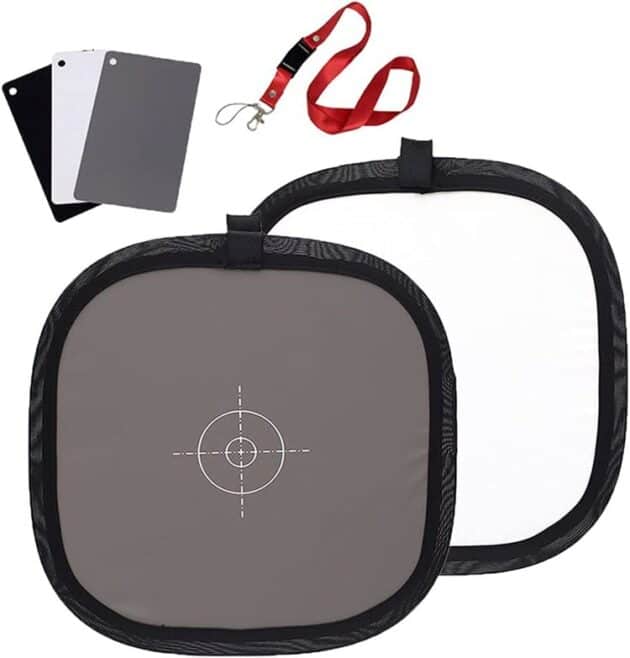
While some cameras automatically look for the whitest point in the image, using white paper or a gray card provides a more reliable reference.
The standard most often used is the 18% Gray Card which sounds a bit strange given we are looking for a pure white reference!
The reason it is used is because the card itself is color neutral so if one color such as blue or yellow is dominant in the shot the camera will easily pick this up.
Many better cameras will have a feature whereby you place the card in the light you are using, direct the camera at the card and tell it that it is a gray card.
The camera then sets itself to turn the card pure gray and there you go! White balance set.
The Process
Place a white or gray card in front of your subject’s face with your lighting set to how it is going to be in the shot.
Zoom in on the card until it fills the center of your frame.
Then, use your camera’s custom white balance setting to sample the color off the card.
Check your own camera’s manual for exactly how to do this as there is some variation between manufacturers.
LED Lighting
LED lights are becoming more and more common due to their availability and them dropping dramatically in price.
More importantly most LED lights these days come with clear indications on them as to the actual temperature they are delivering the light at.
Whilst most are pretty accurate you should always set the white balance manually regardless of this because you may be getting bounced light off other surfaces in the room or area you are shooting in.
This may slightly change the temperature you are actually getting.
If you tend to use the same lights consistently, setting the camera to the same temperature as the light will likely yield positive results.
Mixed Lighting
It’s tricky when there’s light coming from all directions or in shade indoors because there are warm spots and cool spots.
In cases like this, measuring your white balance manually is key.
This is probably the strongest point on which the use of a gray card or white card rests.
By manually setting the white balance at the actual point of what it is that you are shooting you have the best chance of getting it right.
A Word on “Fix it in Post”
I don’t want to turn this into a long technical dissertation on the various shooting modes of cameras but I think it is relevant to this discussion.
At a professional level some video creators make use of the shooting mode that produces what is called RAW footage.
RAW footage when viewed back looks awful!
It is gray and featureless, lacking contrast or any redeeming quality from a viewing perspective!
The reason for that is that RAW footage is strictly a capture format and doesn’t waste time or space in the produced files for making things look pretty.
Its sole purpose is to capture as much pure data from the camera sensor as possible at the time of shooting.
The reason people use it is because it allows for very dramatic and severe manipulation of that footage once it is in editing software.
However for the average user this is way over the top and far beyond what any newcomer to the subject need worry about.
Some people preach “shoot in RAW and fix it later.”
While RAW offers flexibility, why not get it right in-camera in the first place?
Shooting normally and nailing your white balance saves time and effort.
Final Thoughts
Don’t let weird colors and color casts ruin your videos.
If you take control of your white balance from the outset you can get those colors looking perfect right in the camera.
For a little extra study here’s a video by MarkusPix on YouTube that gives a little more information and some context for a lot of what has been discussed.
Leave a Reply