
If you’ve ever exported a video, uploaded it somewhere and watched the quality fall apart for no obvious reason, you already know why this topic matters.
Video formats aren’t the most exciting subject in video editing, but they quietly control almost everything about how your final video looks, plays and gets accepted (or rejected) by the platform you’re uploading to.
So let’s take the mystery out of it.
What Are Video Formats?
A video format is simply the way your video’s data is packaged and stored.
Think of it like a shipping container.
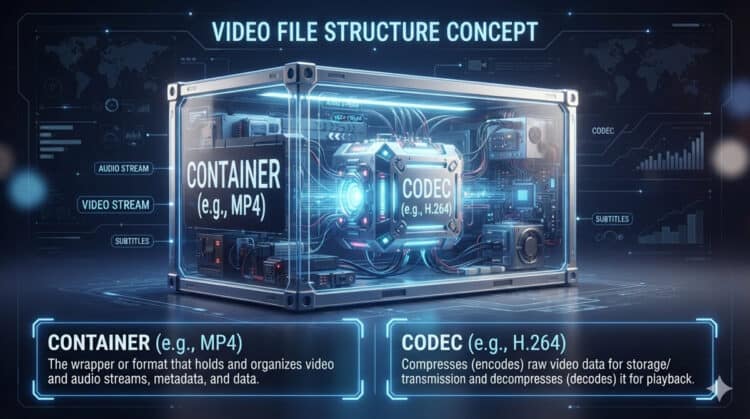
Inside that container are two very different kinds of cargo: the video and audio data itself, compressed down to a manageable size and the instructions for how to unpack and play it back correctly.
The format is what holds all of that together in a single file you can open, share or upload.
Why does this matter so much?
Because the format you choose affects your file size, your video quality and whether the file will even open on someone else’s device or software.
Pick the wrong one, and you might end up with a beautiful video that nobody else can actually watch.
Before we go further, it helps to get comfortable with two terms you’ll run into constantly: codecs and containers.
People use them interchangeably all the time, but they’re not quite the same thing and understanding the difference will save you a lot of confusion later.
A Codec, (short for “coder-decoder”) is the software method used to compress your video down to a reasonable size and then decompress it again for playback.
Without compression provided by the codec, raw video footage files would be enormous and so data heavy that playback would be difficult to execute.
A codec is essentially the recipe for squeezing that footage down without losing too much quality in the process.
Common codecs include H.264, H.265, and VP9.
A Container, on the other hand, is the actual file you save and share.
It holds the compressed video and audio together, along with subtitles, metadata and other extras all wrapped up in a format your computer or phone knows how to read.
MP4, MOV, and AVI are containers, not codecs.
So when someone says “what format is that video in,” they’re usually asking about the container, even if the real quality question is about the codec sitting inside it.
Here’s a useful way to picture it: the container is the box, and the codec is how the contents of that box were packed.
Same box, different packing method and you can end up with very different results in terms of file size and quality.
Types of Video Formats
Now that we’ve got the vocabulary sorted out, let’s walk through the formats you’ll actually encounter as a creator.
There are dozens of them out there, but only a handful cover the vast majority of actual real-world use.
MP4 (MPEG-4 Part 14)
MP4 is the format most creators reach for by default and there’s a good reason for that.
It offers a strong balance of quality and file size and is compatible with nearly every device, platform and piece of editing software you’ll ever use.
Most MP4 files use the H.264 codec, though newer ones increasingly use H.265 for better compression resulting in smaller file sizes at the same quality.
If you’re uploading to YouTube, Instagram, TikTok or just about anywhere else, MP4 using the H.264 codec is almost always a safe bet.
MOV (QuickTime Movie)
MOV was developed by Apple, and you’ll see it constantly if you shoot on an iPhone or edit in Final Cut Pro.
It supports high-quality video and is a favorite among professional editors because it handles multiple video and audio tracks well.
The trade-off is file size.
MOV files tend to be larger than MP4s, and while they play natively on Mac and iOS, Windows users sometimes need extra software to open them smoothly.
Bear in mind that the underlying codec used for MOV files is also H.264.
AVI (Audio Video Interleave)
AVI has been around since the early 1990s, which tells you something about how durable it is.
It offers excellent quality because it doesn’t compress video as aggressively as some newer formats.
That’s also its biggest downside: the files are large and AVI isn’t well suited for streaming or uploading to social platforms.
You’ll mostly see it used for archiving high-quality footage or in older editing workflows.
MKV (Matroska Video)
MKV is a bit of an outlier because it’s an open-source container designed to hold almost anything you throw at it, including multiple audio tracks, subtitles in different languages and high-resolution video.
It’s popular for storing movies and high-quality downloads, but it’s not widely supported by social platforms or some editing programs, so you’ll rarely export directly to MKV for publishing purposes.
WebM
WebM was built specifically with web streaming in mind and it shows.
It produces smaller files without sacrificing much quality, which makes it a favorite for websites that need videos to load quickly.
You’ll find it used often in web embeds and by platforms that prioritize fast playback over universal compatibility.
WMV (Windows Media Video)
WMV was Microsoft’s answer to efficient video compression and it still shows up in some Windows-based workflows and older presentation software.
It has largely fallen out of favor for general content creation, mostly because it doesn’t play as smoothly outside the Windows ecosystem.
The bottom line?
MP4 covers most of what you’ll need day to day, MOV is common if you’re in the Apple ecosystem, AVI and MKV serve more specialized archiving or storage purposes and WebM and WMV each have narrower use cases tied to specific platforms.
Choosing the Right Format

So how do you actually decide which format to use for a given project?
It comes down to three main questions: where is this video going, what’s it for and who’s going to be watching it?
Platform Matters More Than You Think.
Every platform has its own preferences and technical requirements and uploading the wrong format can mean low quality re-compression by the platform (they all do it automatically), longer processing times or in some cases outright rejection.
YouTube, for instance, recommends MP4 with H.264 compression while Instagram and TikTok are similarly MP4-friendly.
If you’re delivering a video for a client’s website, on the other hand, WebM might be the better call because it loads faster for visitors.
Purpose Shapes your Priorities.
A quick social media clip and a polished client presentation aren’t chasing the same goals.
Social content usually prioritizes fast upload times and small file sizes, since it’s going to be viewed briefly on a phone screen.
A professional presentation or a video you’re archiving for future edits deserves a format that preserves as much quality as possible, even if that means a larger file.
Your Intended Audience Affects Your Choices Too.
If you’re sending a video directly to someone rather than uploading it to a platform, think about what device and software they’re likely to use as well as how you are going to “transport” that file.
A MOV file will open effortlessly for a Mac user but may cause issues for someone on an older Windows machine.
This is where resolution and quality settings come into the picture, because format and resolution work together, not separately.
A high resolution file in a poorly optimized format can still look worse than a properly compressed video at a lower resolution.
When you’re exporting, pay attention to your bitrate, which controls how much data is used per second of video.
Higher bitrates generally mean better quality, but also bigger files, so you’re always balancing the two.
A few practical habits worth adopting:
- For social media, export in MP4 with H.264 compression, and check each platform’s recommended resolution and aspect ratio before you upload.
- For professional presentations, favor higher bitrates and, if the venue allows it, formats like MOV or ProRes that preserve more visual detail.
- For long-term storage of your raw or master files, keep a high-quality archival copy separate from the compressed versions you actually distribute. You’ll thank yourself later when you need to re-edit something.
Troubleshooting Video Format Issues
Even with a solid understanding of formats, you’re going to run into problems sooner or later.
That’s just part of working with video so let’s cover a few common issues and how to handle them.
Playback Errors.
If a video won’t open or play smoothly on a particular device, it’s usually a codec compatibility issue rather than a problem with the file itself.
The container might be fine, but the specific codec inside it isn’t supported by that device or media player.
Installing a broader codec pack, or simply converting the file to a more universally supported format like MP4 with H.264, usually solves this.
Keep in mind that common codecs such as H.264 and H.265 achieve their small file sizes by literally throwing away data to do so.
When the file is to be played back, your computer or playback device has to do an enormous amount of work to “reconstruct” the data that was thrown away.
As a result, the playback error may be a problem stemming from insufficient computer resources rather than any particular problem with the video file itself.
Quality Loss During Editing or Exporting
Every time you compress (or re-compress) a video, you lose a little bit of information.
This is called lossy compression and it’s how most everyday formats keep file sizes manageable.
The problem creeps in when you repeatedly export and re-import the same footage, because each compression pass compounds the quality loss.
Where possible, edit from your original high-quality source file rather than a version that’s already been compressed once.
Converting Formats Without Losing Quality.
When you need to convert a file from one format to another, use a reliable converter and export at a bitrate equal to or higher than your source file.
Going higher on the bitrate will not actually improve or upscale the original file in any way but it will ensure that you have the best possible reproduction of what you already have.
Dropping the bitrate during conversion is one of the fastest ways to introduce visible quality loss.
It’s also worth doing a quick side-by-side comparison after converting, just to catch any issues before you distribute the file.
Quality Loss after Uploading to Social Media Platforms
This is something that frustrates a lot of creators: your video can look perfect on your computer and still look compressed and blurry once it’s live on a platform.
The reason for this is that every social media platform re-compresses videos automatically on upload to save on storage and bandwidth as well as providing them with a range of copies that they can choose from.
The choice they then make is based on the internet connection speed the user has as well as the type of device and screen size being used.
No matter how good your original file was, you can’t eliminate this entirely, but you can minimize and loss of quality or degradation.
Export at the platform’s recommended settings, avoid unnecessary re-encoding before you upload and use the highest quality settings your export software allows within those recommendations.
Think of it as giving the platform the best possible starting point, since you don’t have control over what happens after that.
Useful Tools and Further Reading
- Format conversion, HandBrake is a free and reliable option that handles most conversion needs well.
- For diagnosing exactly what’s inside a file, including its codec, bitrate, and container details, MediaInfo is a great free tool that takes the guesswork out of troubleshooting.
- Most editing software, including CyberLink PowerDirector, Filmora, Movavi Video Editor and CapCut, include built-in export presets tailored to specific platforms, which takes a lot of the manual guesswork out of the equation.
- Why Do My Videos Look Bad After Uploading? (And How to Fix It) – A comprehensive article on debugging quality issues when uploading to various social media platforms.
- Video Editing for Different Social Media Platforms – A comprehensive article on the exact technical requirements needed for various social media platforms.
- MPEG2 AVCHD MP4 Editing Problems Explained – A full explanation of how modern codecs achieve the small file size / quality balance and reason they may be problematic to edit.
Video formats might seem like a technical footnote compared to lighting, framing, or storytelling, but getting them right is what makes sure all that other hard work actually reaches your audience the way you intended.
Once you understand what’s happening under the hood, choosing the right format for any given project stops being a guessing game and starts being second nature.
Key Takeaways
- Video formats determine how a video’s data is packaged, affecting quality and compatibility.
- Understanding the difference between codecs (compression methods) and containers (file formats) is crucial.
- MP4 is the most versatile format, suitable for social media, while MOV is preferred in the Apple ecosystem.
- When choosing a format, consider the platform, purpose, and audience to ensure optimal playback.
- Troubleshooting common video issues often involves codec compatibility, quality loss during editing, and format conversion challenges.
Leave a Reply